IoT Product Development [Explained]: 9 Steps to Production
![IoT Product Development [Explained]: 9 Steps to Production](https://webbylab.com/wp-content/webp-express/webp-images/uploads/2024/10/upload_671fa7a3c3f6f-791x267.png.webp)
Launching an IoT product requires a solid foundation. The IoT device design & development underpin these systems.
But here’s the question!
Should you pick ready-made IoT devices from reliable manufacturers or handle IoT device development yourself?
While pre-made solutions may seem like a shortcut, finding the perfect fit can be challenging.
Just consider lacking features or issues with meeting performance needs. In these scenarios, custom IoT product development becomes necessary.
However, building IoT devices can be overwhelming as it’s a complex, multi-stage process that requires specific engineering skills and deep domain knowledge.
Before developing my own IoT product, I would check if there are ready-made solutions on the market that can be bought. If someone decides to create their own IoT product, they should contact specialists and be prepared that this is a long process with guaranteed several iterations. You need to be patient and understand that mistakes made at this stage will be very difficult or even impossible to correct in production.
Kostiantyn Oliynyk, Head of IoT at WebbyLab
In this article:
- our WebbyLab IoT team provides a concise IoT device design & development process description,
- We cover market research, defining functionality, concept proofing, prototyping,
- Discuss IoT device production stages, aimed at helping developers create efficient IoT solutions.
You will also learn about our recent IoT product development project, such as Propuskator ACS, Analog Intercom Converter, and beyond.
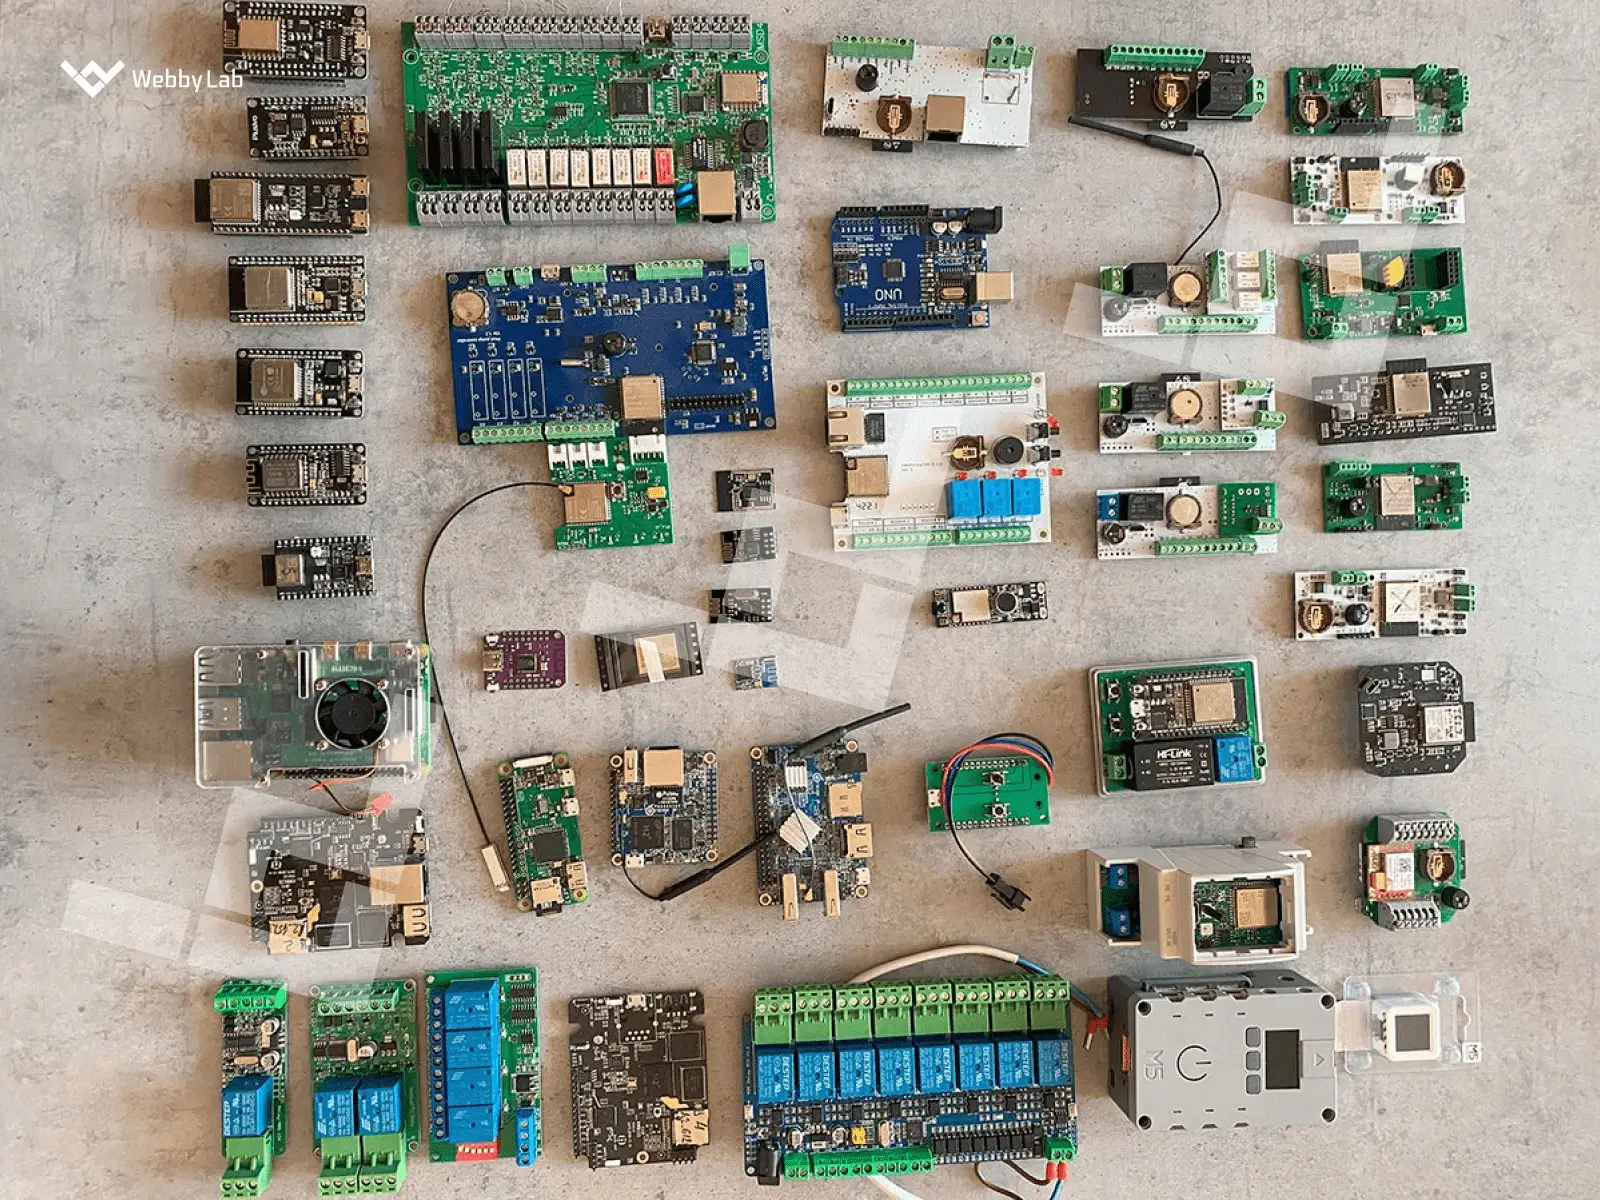
Propuskator IoT controller devices developed from scratch and tested using existing solutions by WebbyLab experts
9 Basic Aspects of IoT Product Development
At WebbyLab, we divide the IoT device development process into 9 steps.
In this section, we will describe it in detail using our Access Control System (ACS) and Analog Intercom Converter PoC projects as examples.
#1 Define Functional Requirements
Creating a list of functional requirements is a fundamental stage in Internet of Things device development. They describe how your device will operate, how it will coordinate with other devices, how it will connect to a network, and beyond.
Before you start planning how to make your own IoT device, it’s essential to understand the basic features it should include.
Thus, you’ll have a better idea of the target project’s cost estimation and delivery time. Moreover, it will provide you with highlights on what to look for when choosing between the teams of dedicated IoT developers, or when partnering with a reliable IoT product development company to ensure professional guidance and quality execution.
Some capabilities to consider include:
- Data-Based Processes (Acquisition, Control, Processing, and Storage): for rapid performance and improved productivity.
- Connectivity & Flexibility: to easily connect with cross-domain technologies (cloud computing, AI, blockchain, etc.) and adjust following the environment changes and current requirements.
- Security Concerns: ensuring stable data manipulation and storage while preventing possible breaches.
- Power Management: enabling autonomous operation and energy consumption efficiency.
This IoT product development stage helps you achieve critical outcomes:
- Define core and secondary functionalities. Identify features essential for your business model and how users will interact with the device.
- Solidify requirements. Precise requirements guide subsequent steps and ensure accurate research.
- Prioritize features. Determine the must-have core functionalities and optional features. Plan for potential future additions.
- Shape project scope. Outline the project stages beyond the device itself, including its interactions with applications, cloud platforms, and other devices.
Pro tip!
WebbyLab experts always handle this stage in our projects and client collaborations. This way, we decompose the project into smaller deliverables, identifying the necessary contractors, the expertise required for each phase, and desired expectations.
Alexey Krol
Chief Business Development OfficerConsulted 30+ IoT startups to speed up time to market.
Get a ConsultationIt also establishes the basis for developing the RACI matrix of responsibilities.
On top of that, it is important to create a block diagram of the device at this stage. It brings several benefits:
- Understand business logic.
- Confirm desired functionality.
- Identify critical components and potential bottlenecks.
- Plan peripheral interaction.
What We Did In Real Project
At this stage of our ACS project, we came up with the controller functionality requirements. We also decided to make a line of devices with different sets of features. But generally, the controller had to support:
- gate or barrier drives as well as electric locks (including various types of locks).
- any tag readers utilizing the Wiegand protocol.
- backup communication with a cloud server.
- exit buttons, open and close sensors for doors and gates or barriers.
- autonomous work in case of internet connection loss.
A cloud-based management feature of the Propuskator access control system
Want to kick off your own IoT project? Let’s get in touch!
#2 Conduct Competitive Research
Another thing to consider before you learn how to make an IoT device is profoundly researching similar solutions already available on the market. You can do this in the following ways:
- Global and local market scan. Start by searching for similar or identical solutions on the market. It’s helpful to familiarize yourself not only with your local market but also with a global one.
- Hands-on assessment. Purchase and test competitor products firsthand to gain insights into their strengths, weaknesses, and practical performance. This evaluation lets you compare their capabilities and identify which solutions best meet your needs.
- Strategic responses to missing competitors. If you haven’t found similar solutions, this can mean both good and bad news. It could signal a groundbreaking innovation, so validate with domain experts. But beware — it might also mean your product solves a non-existent problem or reflects a misunderstanding of the field. Seek expert guidance to turn this uncertainty into opportunity.
- Competitive advantage analysis. If you’ve found equivalent solutions, analyze how your product excels. Is it lower price, unique features, user-friendly software, or a combination? Pay close attention to competitor positioning and their must-have functionalities to ensure yours are even better.
Do not neglect the availability of information. If there are ready-made products on the market with which you need to compete, you should start with an in-depth acquaintance with them. It’s much cheaper than making a worse product or copying the existing solutions.
Kostiantyn Oliynyk, Head of IoT at WebbyLab
Pro tip!
WebbyLab prioritizes comprehensive competitive research in every project.
By involving both analysts and engineers, we gain perspectives on market players, leading to data-driven decisions. This collaborative approach often sparks early concept improvements and timely pivots when needed. Importantly, we document any requirements and functionality descriptions changes for future reference.
Vital factors to consider:
- Target audience. Define your end users to optimize functionality and interface. Prioritize simplicity and clarity for consumers while offering flexibility and detailed configuration for engineers, even if it sacrifices some ease of use.
- Connectivity. Analyze connection options (Wi-Fi, Ethernet, Bluetooth) and their feasibility. Consider if the users always have stable Wi-Fi access, if it’s feasible to connect an Ethernet cable, or whether Bluetooth connectivity with phones or gateways is guaranteed.
- Power supply. Determine the most suitable power source for the device. If it’s not an independent device but a controller within the large system’s framework, consider the available power supply methods or install batteries.
What We Did For Propuskator ACS Research Stage
During the research stage of our ACS Propuskator, we handled extensive market analysis, expert consultations, and competitor solution IoT testing. Thus, we got key insights for our controller:
Cloud connectivity
- Our controllers can function in diverse environments, from office Wi-Fi and wired Ethernet to remote locations like parking lots or driveways with cellular to existing legacy systems.
- Selected connection options, Wi-Fi, Ethernet, GPRS/GSM, and RS-485, cover most user scenarios.

Connecting the Propuskator ACS to the Wi-Fi network – Made by Webbylab
Power supply
- 12V or 24V DC are standard, but PoE and battery options are crucial for uninterrupted operation in specific cases.
Controllable devices
- Elevators, bollards, gates, locks, and barriers are common targets.
- Management types include dry contact or solid-state relays for power supply control.
Peripherals
- We identified important peripherals, spanning exit buttons, user ID readers, opening sensors, and alarm systems.
Target users & business models
- We found that demand exists from both consumers and professional integrators.
- The device should be user-friendly for both installation and configuration.
- Two size options will be available: standard for automation panels and compact for socket outlets.
What We Did For Analog Intercom Converter Research Stage
During the competitor research stage of our Intercom Converter project, we identified several ready-made solutions. Our team tested their functionality to identify key strengths and weaknesses in the market.
Testing of the analog intercom inverter conducted by WebbyLab
Before starting Internet of Things device development, decide on the power source, the communication protocol with the cloud, the dimensions of the end device, and the expected cost of the product. The power source and communication protocol will help choose the necessary system on a chip (SoC). The dimensions will make it clear if it’s possible to design such a device, and the cost will show whether it’s profitable to undertake the project at all.
Yehor Fedorov, IoT Project Team Lead at WebbyLab
Want a similar product? Read how to hire IoT developers for your project.
#3 Create a Proof of Concept
At this stage of creating an IoT device, you need to test your ideas using the first version of the device with the most essential functionality.
The PoC stage aims to swiftly and cost-effectively develop a functional IoT prototype. Its key objectives are:
- Validate technical solutions for implementing the final device’s functionalities.
- Evaluate sensor and actuator options to choose the most suitable ones.
- Identify potential risks for early mitigation.
- Gather data and feedback to improve the core concept.
- Assess contractor suitability based on their performance during this phase.
We recommend making Proof of Concept a separate stage in IoT hardware development, with clear goals, timeframe, and resource constraints. It ensures focused development and efficient use of resources.
Pro Tip!
WebbyLab typically assembles the core solution with a focus on cost-effectiveness at this stage.
This involves testing key technical hypotheses and components, as well as analyzing the performance of controllers and modules.
You can also use ready-made hardware at the PoC stage. In the table below, you’ll find some of the most common off-the-shelf solutions, their functionality, and examples.
| Hardware Category | Purpose of Use | Hardware Example |
| Microcontroller development boards (SoC) | The MCU operates smart devices by providing processing power, memory, and input/output peripherals. | NodeMCU — most popular ESP32 dev board for prototyping in IoT. |
| Single board computers (SBCs) | SBCs’ performance is native to a regular PC, which in IoT enables effective and quick testing of the IoT design. It allows attaching peripheral devices, testing hardware/software compatibility, prototype performance etc. | RaspberryPi — the leading SBC for prototyping in IoT. |
What We Did In Our Project
In our IIoT use case, we created the PoC with the help of the NodeMCU Dev Board and breadboard. Our goals were to study the features of electric lock controlling and automation drive controlling. We also wanted to find out the peculiarities of working with access tag readers and choose the optimal power supply for the controller.
For the Propuskator ACS, we checked the workflow through Wiegand protocol readers and tested the management of locks and gates. Initially, we gained insights into the launch requirements. However, we went through numerous iterations to establish a comprehensive product line, adding new features and correcting errors through field testing.
In the photo below, you can find several iterations of Propuskator controllers right to left:
- Prototype on a breadboard.
- Prototype on universal boards soldered without a controller.
- The first version of the prototype on a universal board with a controller and main connectors.
- The initial version of the controller with Wi-Fi.
- The first version of the controller with an adapter for additional cards with Ethernet and GSM.
6-8. Modified versions of the initial design with minor edits (6-8).
- The production version of the basic controller with Wi-Fi and relay.
- The production version of the controller with Wi-Fi and GSM.
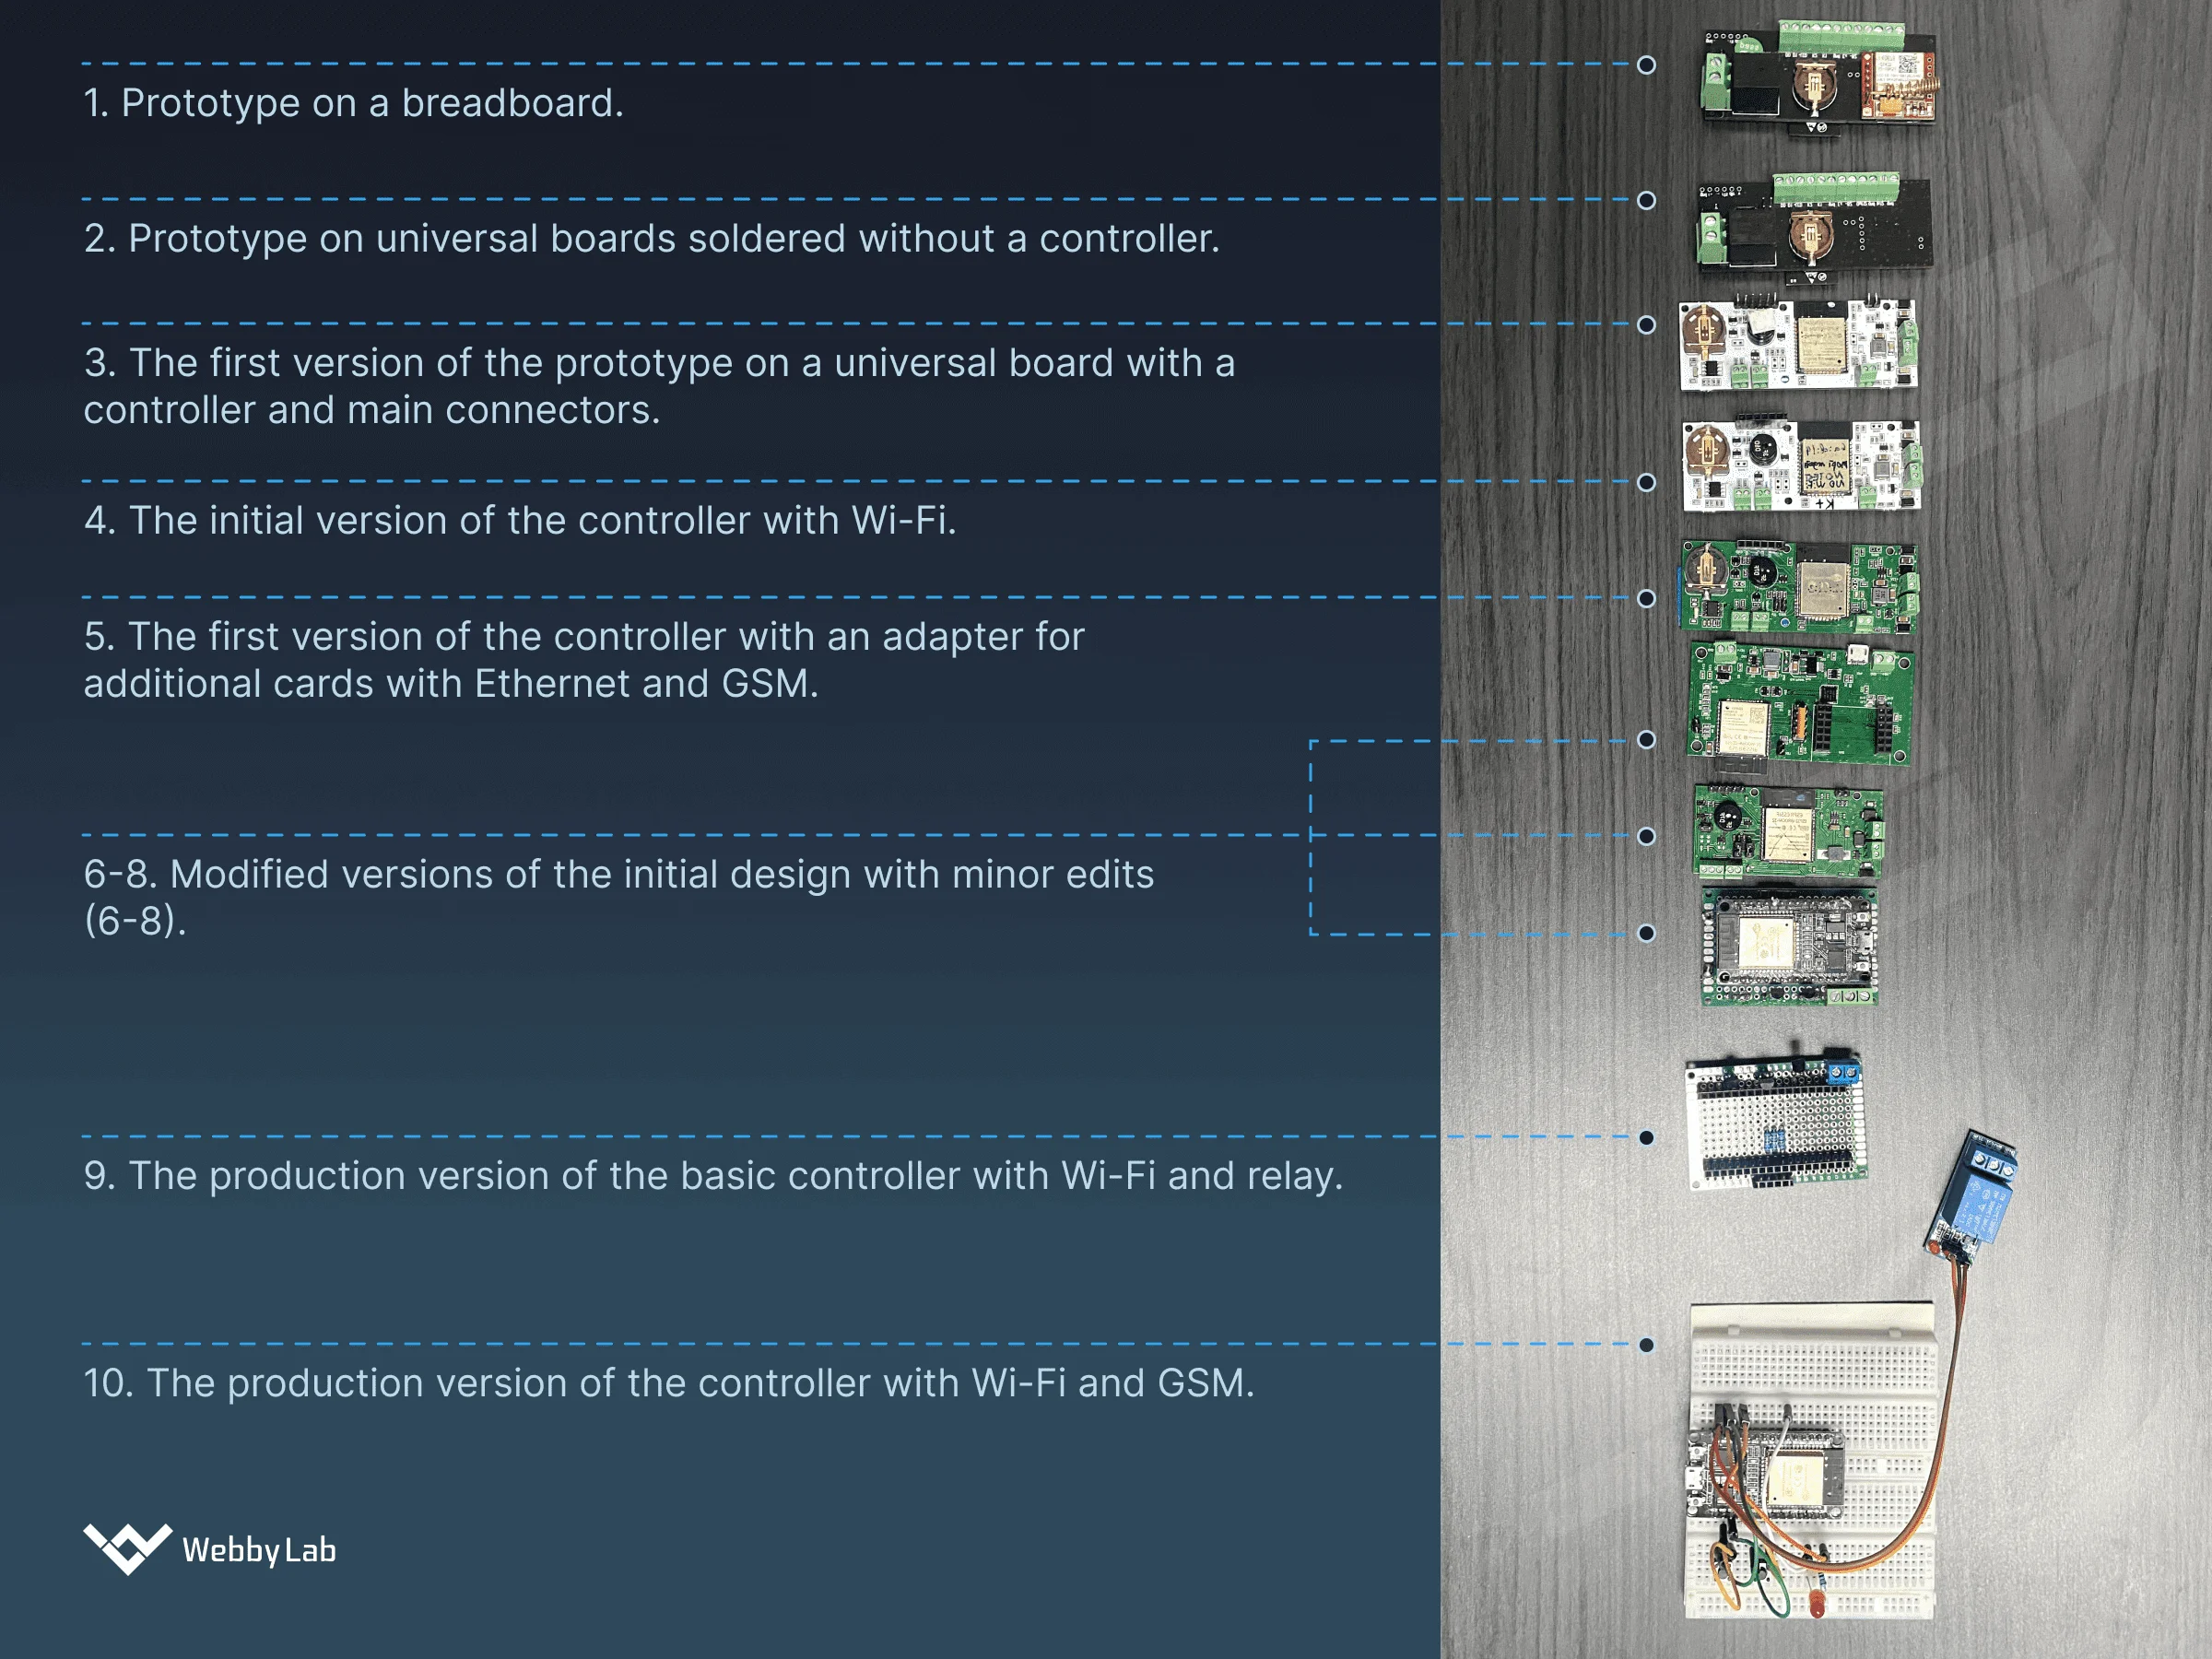
IoT hardware development iterations for Propuskator controller made by Webbylab
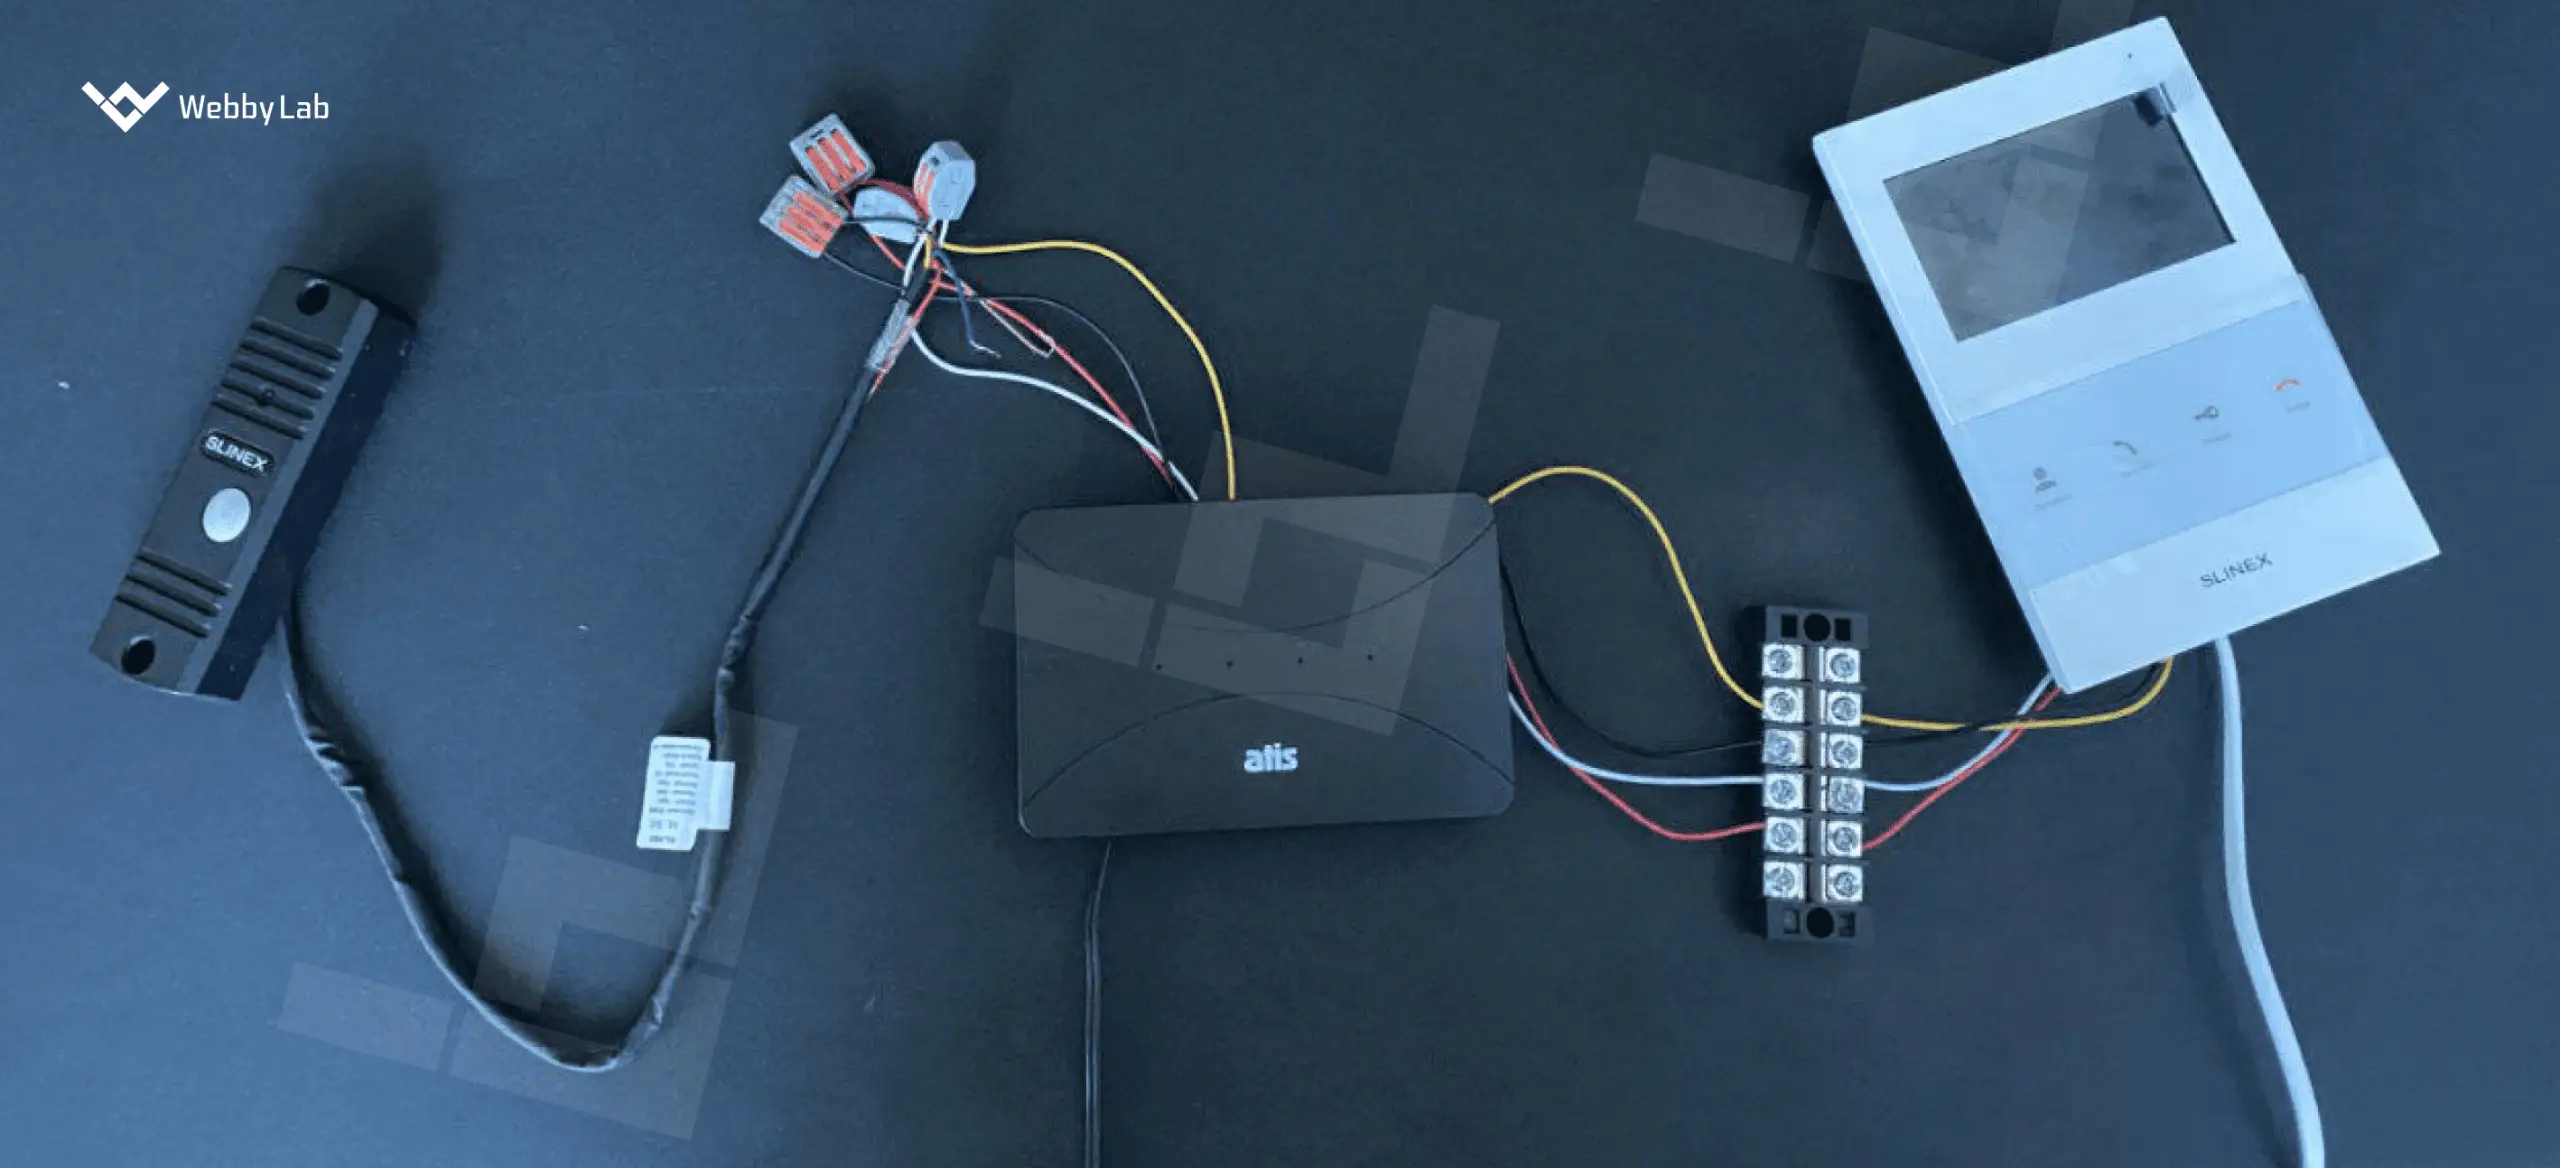
Additionally, we created a prototype for an analog intercom converter.
Using existing components and the Raspberry Pi microcontroller, we assembled a functional solution.
This prototype enabled the digitization of video and audio from a conventional analog intercom, transmitting it to modern IP intercom systems while supporting two-way communication and management.
The outcomes of this Proof of Concept established the final requirements, which were then handed over to hardware development engineers.
A prototype of an analog intercom converter
Not sure how to make your product’s PoC? Opt for our IoT consulting services!
#4 Develop Hardware
IoT hardware development is a distinct and iterative phase comprising multiple stages, managed by individual hardware engineers.
Additionally, when the developed IoT product isn’t the final device, it involves selecting various components, creating the body and frames, handling electrical and plumbing aspects, and more.
In such instances, dividing the stages and engaging specialists with expertise in their respective fields, along with chief engineers who supervise the entire process, is often more effective.
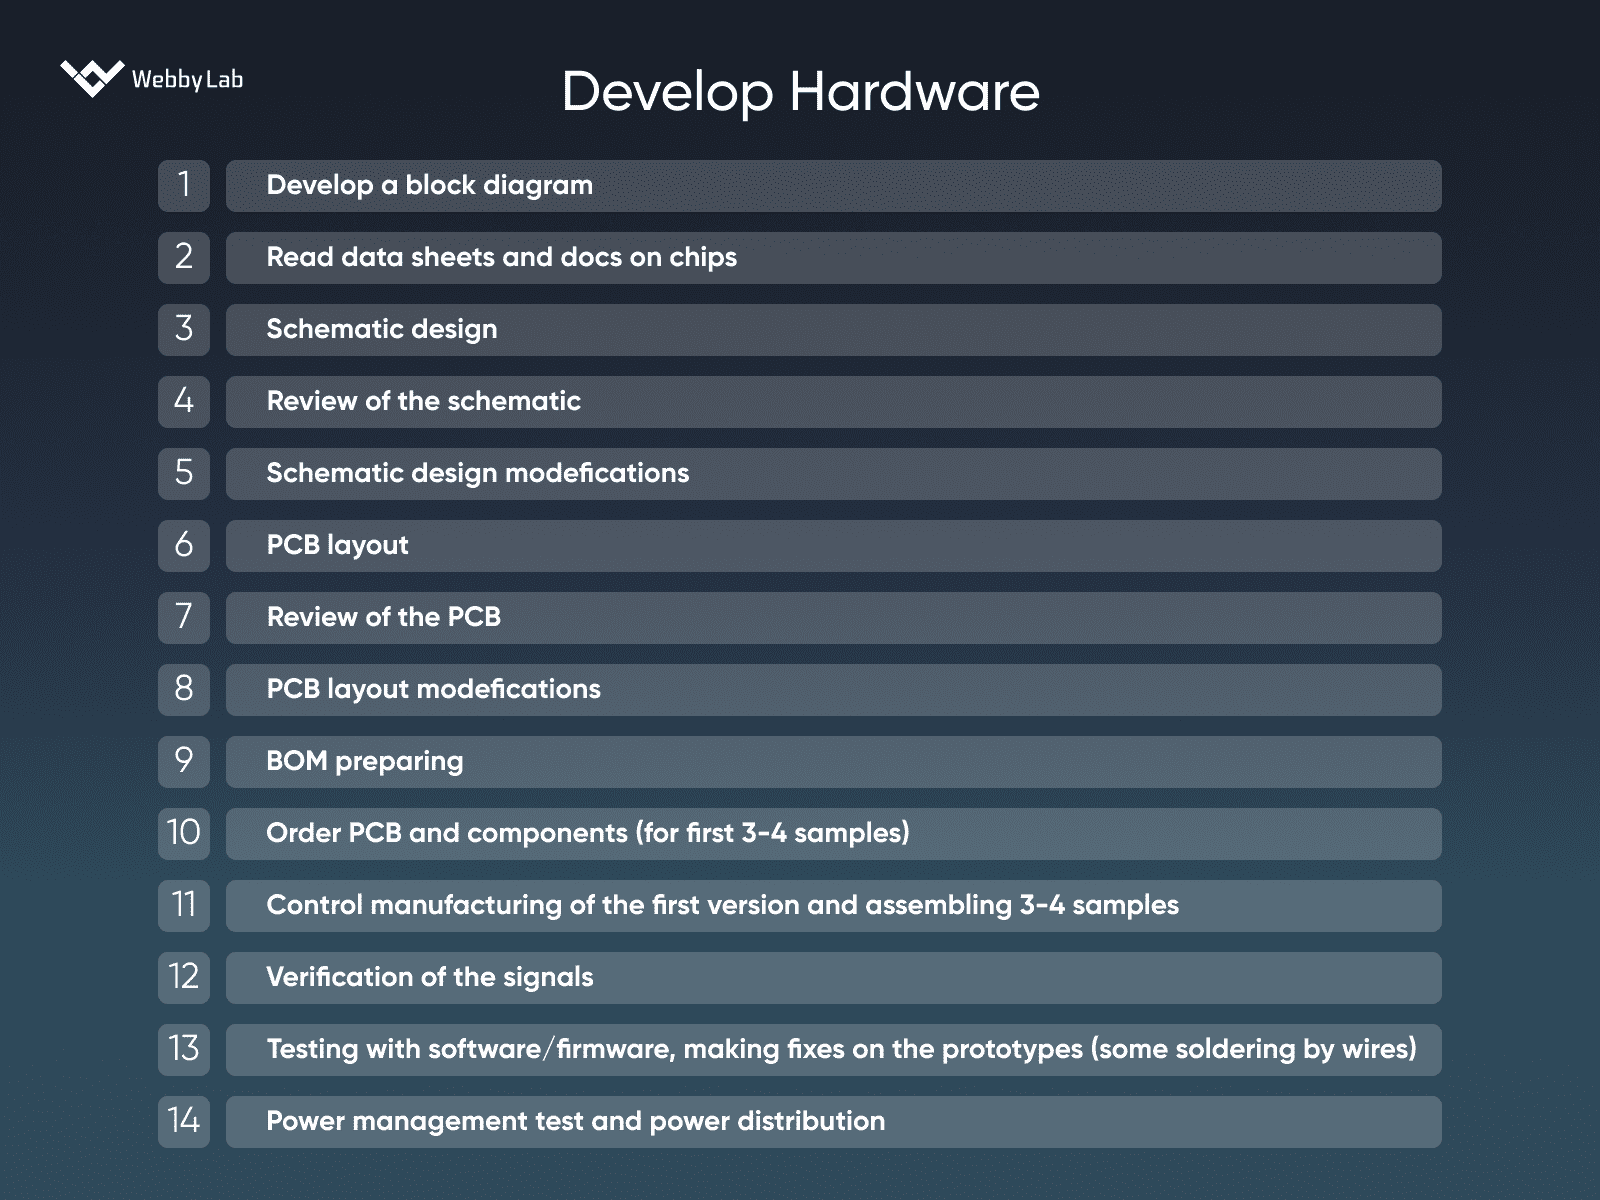
Here are the steps typically undertaken by engineers during this stage of IoT product development:
- Develop a block diagram.
- Read data sheets and docs on chips.
- Schematic design.
- Review of the schematic.
- Schematic design modifications.
- PCB layout.
- Review of the PCB.
- PCB layout modifications.
- BOM preparing.
- Order PCB and components for the first 3-4 samples.
- Control manufacturing of the first version and assembling 3-4 samples.
- Verification of the signals.
- Testing with software/firmware, making fixes on the prototypes (some soldering by wires).
- Power management test and power distribution.
The above are the stages of the initial iteration, typically requiring two or even three cycles to create an IoT device that addresses all intended tasks.

The developed analog intercom converter board from the first tests – Made by Webbylab
During this phase, it is crucial to acquire essential artifacts necessary for mass production, such as the BOM file, Gerber file, and schematic diagram of the device. Besides, collaborating with the manufacturer is vital to understanding the available methods for flashing devices in production and establishing necessary contacts or interfaces.

An example of a Gerber file of one version of the Propuskator controller – Made by Webbylab
Want to streamline hardware development? Reach out to us for expert guidance!
#5 Develop Firmware
The firmware development phase can begin alongside hardware development once the microcontroller type and key elements are identified. WebbyLab handles this stage following standard SDLC procedures.
At this point, consider the need for over-the-air (OTA) firmware updates, implement security measures, protect the device from unauthorized flashing, and ensure the confidentiality of logs and sensitive information.
It’s also significant to anticipate mass production requirements, where devices will need to be flashed with unified firmware and assigned a unique identifier. Additionally, you should prepare instructions for flashing and testing devices.
If necessary, the development of a built-in admin panel for offline management of controllers can also be handled.
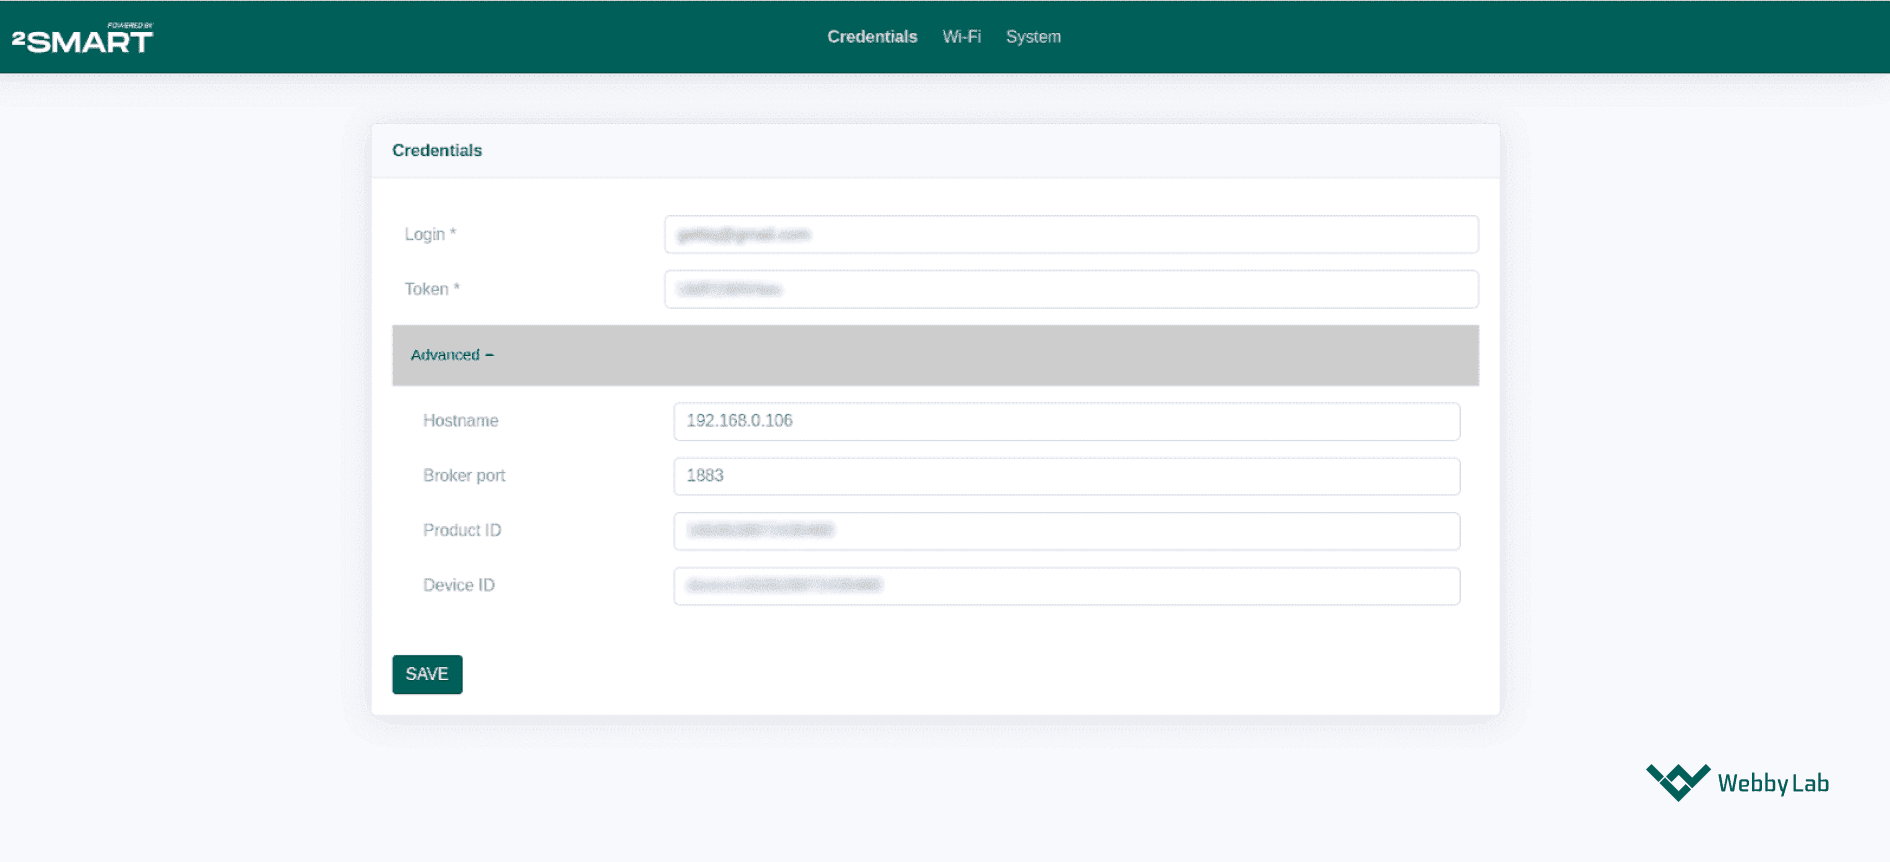
A built-in admin panel for offline management of IoT devices in 2Smart – Made by Webbylab
Need custom firmware for your IoT device? Rely on our expertise in firmware development!
#6 Launch an MVP
Launching the IoT device MVP at the earliest opportunity allows you to witness the product in action, gather initial feedback, and identify potential issues.
To launch the IoT device MVP successfully, organize production, have the firmware and other necessary software ready, and ideally, establish a user group for feedback collection. Maintaining backward compatibility becomes necessary after this stage. It’s best to consider this aspect in advance.
For teams launching a commercial IoT product and looking to reduce time-to-market without sacrificing ownership, IoT SaaS and PaaS development on a proven core can cut months off the build phase while keeping the architecture fully adaptable.
If your product sits in the HVAC or heating equipment category, the platform decision has additional dimensions — regulatory compliance, installer tooling, and new revenue streams. Our guide on building an IoT platform for heating equipment makers covers exactly what a manufacturer-grade connected platform delivers beyond “your boiler on an app.”
Want to learn more? Read our blog post about the IoT-based MVP development process.
#7 Refine and Adjust
This stage involves going from the first to the sixth phase again after receiving feedback from users and the market. Simply put, it’s a process of making corrections, additions, and improvements based on the collected insights.
Pro tip!
After the MVP launch, the product starts gathering invaluable feedback from real users. At this stage, WebbyLab immediately establishes communication channels, support tools, tutorials, and other means of feedback collection.
While not critical, having automated analytics tools to track user behavior, pain points, or success areas is beneficial for continuous product improvement.
By collecting and studying user feedback, we get:
- Critical issues breakdown.
- Improvement suggestions.
- New feature ideas.
- Requests for alterations and changes.
Effectively managing the above aspects is vital for the product at this stage.
We recommend completing the full cycle of such tasks, including market and competitor analysis. This will help you stay in control of product development under customer pressure.
20% of the functionality addresses 80% of the customer’s needs. This 20% constitutes the MVP. After launch, a challenging and long-term process begins, requiring substantial effort, with impacts less evident than in the first 20%. Businesses should get ready for this.
Kostiantyn Oliynyk, Head of IoT at WebbyLab
#8 Launch Mass Production
For this stage of the IoT product development life cycle, you should select a manufacturer based on region, pricing, and other criteria. Provide the chosen manufacturer with all necessary hardware and firmware materials to obtain a production batch estimate.
At this point, organizing a quality control stage is essential. Provide testers with scripts, which can be developed by hardware and firmware engineers. Additionally, consider incorporating specialized modes of operation, developed in stages four and five, for quality control testing of both physical and software components.
The CPR-WR version of the Propuskator controller in a case printed on a 3D printer
Having received a working ACS controller on a breadboard, we manufactured 50 devices.
Due to the throughout prototype testing, the entire batch was deployed with zero issues. It’s worth mentioning that the production-ready device can further be altered according to your needs.
For example, the ACS we helped to launch underwent numerous changes long after: we added new functionality such as GSM Modules, Power over Ethernet ports and RS-485 bus communication method:
- GSM Modules can serve as an alternative way for a device to establish a connection in areas without Wi-Fi and Internet coverage.
- Power over Ethernet ports allowed us to improve the user experience and reduce the costs of running the cables. Thus, thanks to PoE ports, we connected the device to the network and ensured its easy access to the power source.
- RS-485 bus serves as an alternative communication method as its development turned out to be more cost-efficient than the bringing new wire lines.
Looking for the right IoT device manufacturer? Make informed decisions with our IoT consulting services!
#9 Support
During this stage, support tools and procedures must be established, including:
- OTA updates.
- Remote control as well as metrics and telemetry collection.
- Factory settings reset.
- Device identification through firmware and stickers.
- Installation and configuration support.
- Return processes.
- Ongoing support.
It’s advisable to consider and plan for these processes collectively during stages 1-4, ensuring their integration for future scalability and efficiency.
Ready to optimize your IoT project support? Get in touch with our experts!
Core IoT Hardware Development Requirements
Considering how to build an IoT product doesn’t solely rely on planning the core features and development tools required. To remain competitive, any IoT device must comply with the basic requirements for this hardware:
- Security. Implementing a security-by-design approach protects against vulnerabilities, cyber-attacks, and data theft.
- Data processing and storage. The number of sensors, data resolution, and sampling rate impact data flow, influencing processing and storage requirements.
- Connectivity. IoT devices rely on networks to communicate with IoT gateways, applications, servers, routers, and other gadgets, enabling them to perform their designed functions.
- Power. Big data processing and add-on functionality increase power consumption, potentially affecting user experience and device purpose.
- Physical design. Considerations include device size, appearance, and special requirements related to environmental conditions.
- Cost. Developers should prioritize cost-effective, long-term solutions for IoT hardware development without compromising quality.
Mistakes Made During the Development of IoT Devices
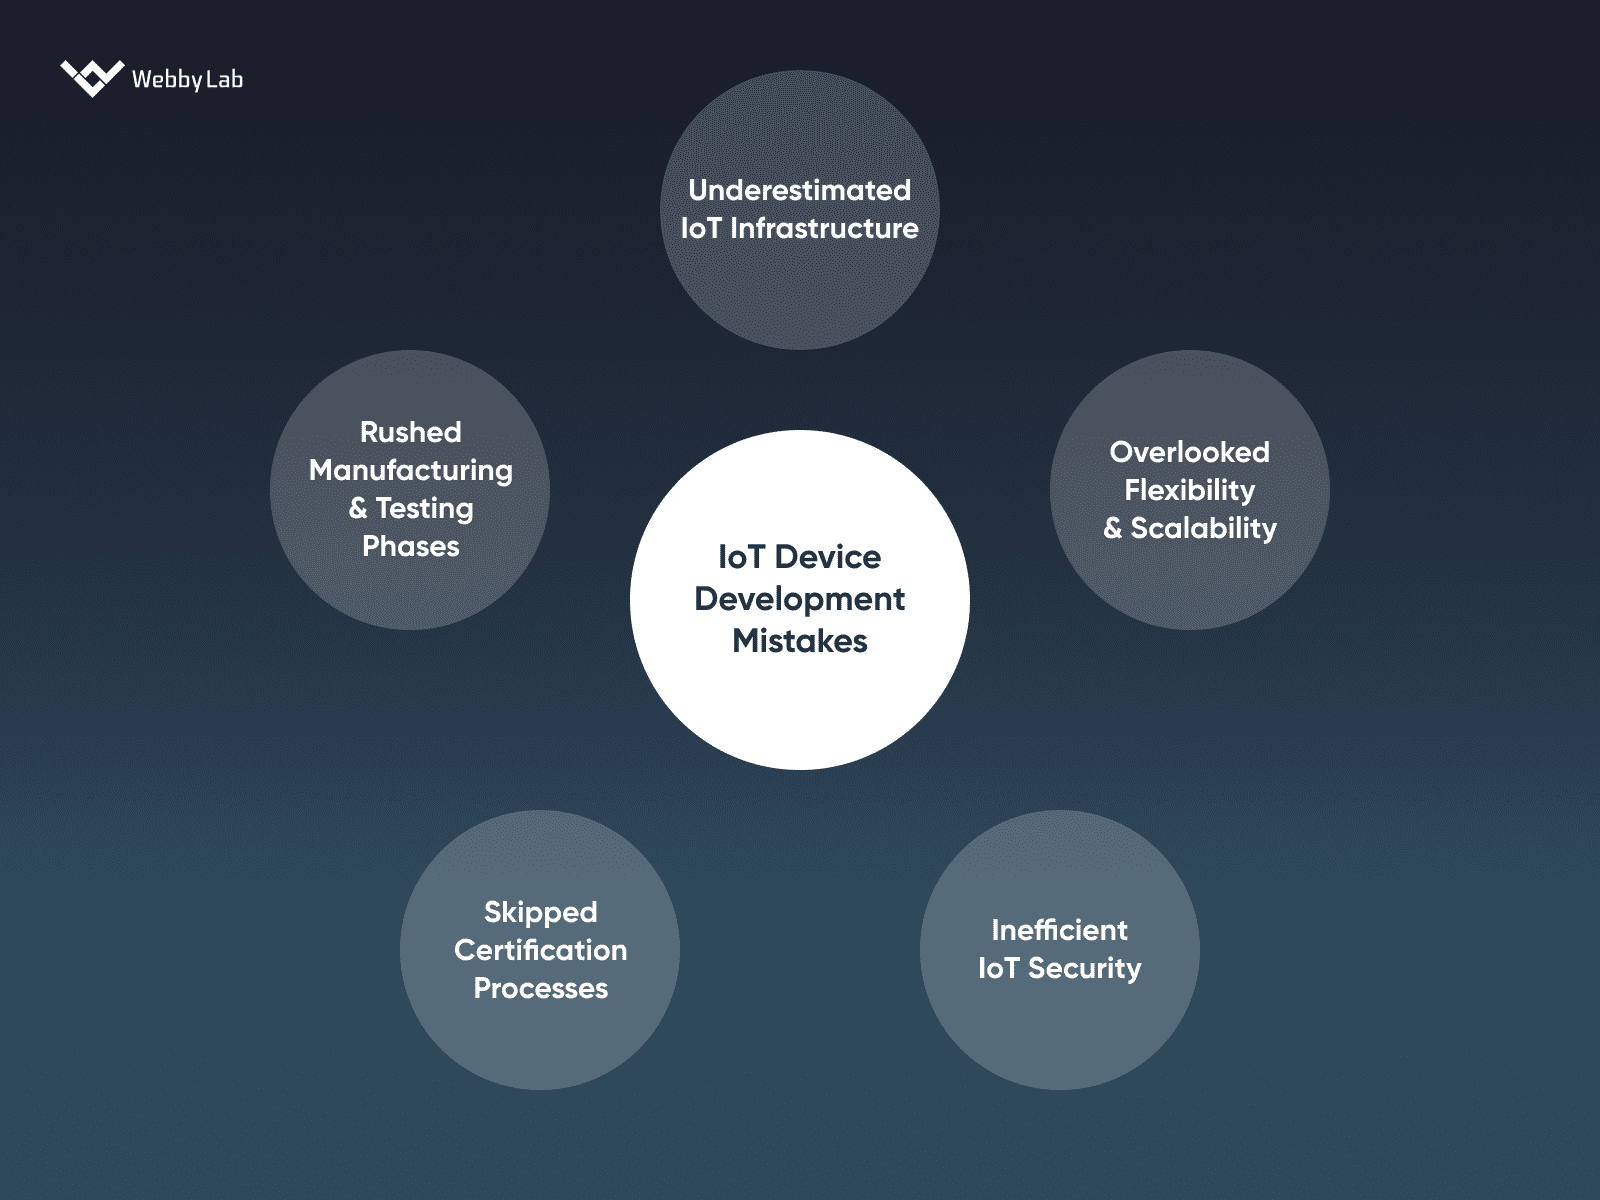
IoT development mistakes to avoid
Despite the importance of speed and responsiveness in IoT device development, companies often overlook factors impacting hardware performance and the final product. Let’s review the typical problems of Internet of Things hardware development for your project.
- Underestimated IoT infrastructure. Companies mainly focus on software development over hosting technology. Yet, integrating hardware, software, and IoT connectivity technologies is essential for successful IoT device outcomes.
- Overlooked flexibility & scalability. Scaling up IoT hardware manufacturing is vital for business growth. However, ensuring your IoT solution can meet emerging customer and market needs is equally crucial in the long term.
- Inefficient IoT security. IoT devices leverage various data to and from cloud apps at light speed, which might easily fall victim to hackers.
- Skipped сertification. Certification is an essential point to consider. Usually, the options you’ll need are PTCRB, FCC, CE, IC, GCF, and RoHS certificates.
- Rushed manufacturing & testing phases. Both processes are a must for preparing your IoT device for entering the market. They’re responsible for efficient time and cost investments, regulatory compliance, and effective supply chain management.
You may also be interested in how to manage a project in 5 steps.
How Much Does It Cost to Make an IoT Device?
The costs required to launch an MVP of IoT product solution and its overall IoT application development time are based on the project’s complexity, deadlines, and technologies involved.
To help formulate more explicit project expectations, below, we’ve analyzed both aspects in a little bit more depth:
It’s required up to 3 months to build an IoT device hardware from scratch. The development time can be reduced to at least one month if there is already some existing groundwork or ready-made materials that can come in handy in the process.
The pricing for the Internet of Things product development has hardly any one-size-fits-all approach.
It highly depends on the scope of work to be done. A small IoT project with a simple device and the results of some groundwork available will require $5,000-10,000. However, the budget for a more complex project such as the one we described above will start at $25,000.
Why Develop IoT Devices with WebbyLab
By leveraging the experience and expertise of WebbyLab, you can access a large pool of tech talents with years of experience and deep knowledge in IoT development.
Regardless of the project’s complexity and budget, our team is ready to deliver the most efficient IoT solution for your business. We also provide IoT consulting services if you have any special needs.
In our IoT product portfolio, we’ve showcased our expertise in prototype development and creating IoT devices for various projects and the challenges tackled within each of those.
One of the recent cases that we’ve worked on was a software solution for MyBox. This company from Eastern Europe manufactures and supplies EV charging stations. They required a cloud management system to support thousands of private and public EV Chargers from various vendors. It had to be accompanied by end-user mobile apps.
To substantially reduce the time to market, we successfully reused a large part of the 2Smart Cloud platform’s functionality. Also, we developed a set of custom features such as advanced user permission management, additional security measures, and data visualizations.
Moreover, we created flexible firmware for the ESP-C3 MCU controlling the chargers to ensure easy scaling and support. On top of it, end-users got comprehensive and modern mobile applications.
Are you already interested?
Feel free to contact us anytime and get a detailed estimation for your IoT project today!
Get Started With Your IoT Product Development Project
Now that you know all the specifics of the step-by-step IoT device development process, and have a better understanding of how to plan your IoT hardware project from scratch. Despite the stereotypes of its considerable pricing and the various difficulties you can face, it’s pretty easy to create and launch an industry-specific IoT solution for any business.
Sure, getting qualified assistance within the target scope is of the essence.
Our experts are always concerned about the results and ready to provide the most effective solutions for your project specifically.
Request a consultation from WebbyLab’s IoT development team and discover how to successfully launch your IoT project right away.


Written by:

Kostiantyn Oliynyk
Head of IoT at Webbylab
With a robust academic background in Telecommunication Systems Engineering, I apply my knowledge to lead innovations in the IoT domain. Starting as the first team member in the newly formed IoT department at WebbyLab, I've spearheaded its growth, fostering the expansion into embedded and hardware development alongside our core software projects. My dedication lies in pushing the boundaries of IoT technology, fostering a culture of innovation and excellence that profoundly impacts our clients' operational success.


FAQ
What are the hardware requirements for IoT?
The IoT hardware development requirements concern security, connectivity, power, physical device design, data processing and storage, and cost.
What are the challenges of IoT device development?
The IoT product development is facing two basic categories of challenges:
- Technological: issues with connectivity, security, standardization, smart data analysis, and compatibility.
- Business: an emerging demand in large-scale manufacturing, simplified usability, device compatibility, software maintenance, etc.
How to reduce the cost of building an IoT device?
According to our experience in IoT product development, the customization of pre-made and test-proven solutions is always cheaper and more effective than development from scratch.
How to choose IoT hardware development vendors?
Once you’ve decided to hire IoT hardware experts for your project, selecting the best contractors will require three basic stages:
- Market research, covering various aspects of the potential vendors, from their services to the minimal project costs and expertise within a particular industry;
- Technical analysis, during which you check the tech stack and equipment the company offers, research their development methodologies;
- Meeting to discuss all technical and organizational aspects. After that, you can make a final decision.