In this guide, we provide you with comprehensive information on how to enable Facebook login in the React Native application, a description of the process of interacting with the server, some of the pitfalls on the way and my groundwork about the case.
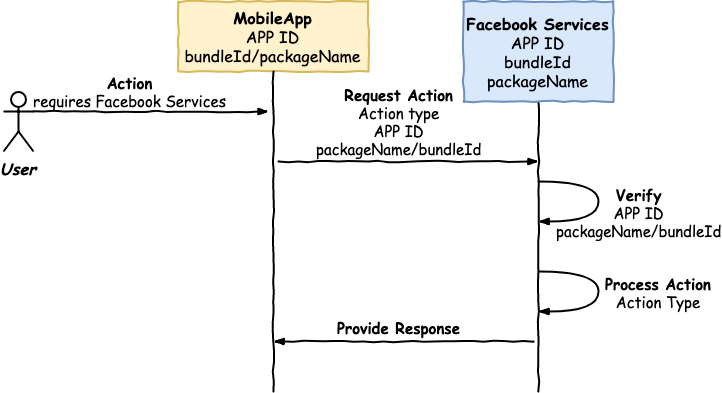
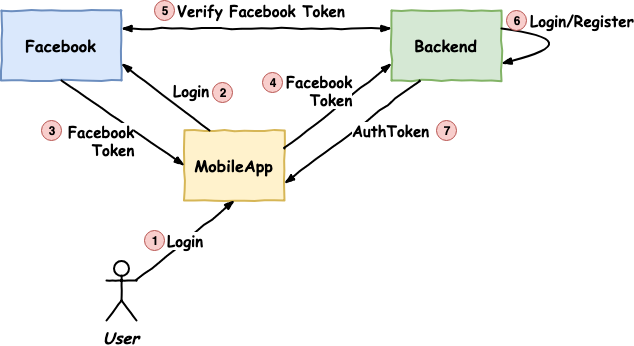
However, before starting, letās consider a diagram of the mobile application interaction with Facebook services. It will allow us to understand why we perform particular actions.
The sequence of interaction is as follows:
By the way, if you need any help with React Native application development, whether it is related to authorization or not, our experts are always ready to help you.
To configure our application and integrate Facebook auth in react native, you must perform the following sequence of actions:
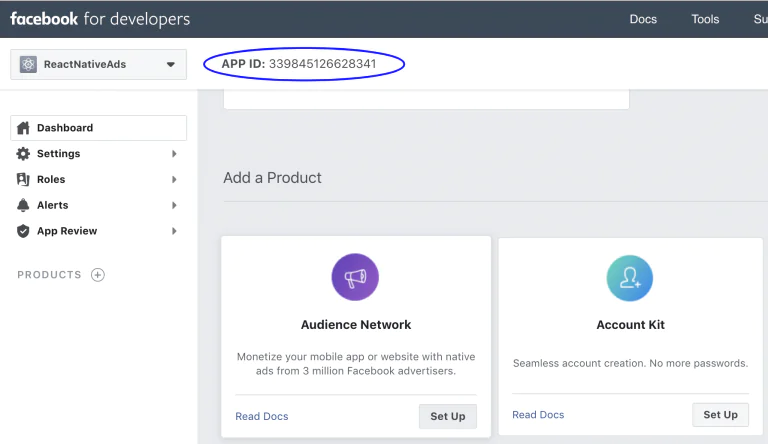
To use the āproductsā provided by Facebook, for example, authorization, advertising, in-app purchases etc. ā you need to create an application in āFacebook for Developersā. After creating the application, you will receive a unique ID, which is required to identify your React Native application on Facebook.
You need to have a Facebook account to create applications on āFacebook for developersā. You can use your personal one, but I advise you to register a separate one. By default, āFacebook for developersā is available for all accounts. So, you can start creating an application.
Go to Facebook Dashboard page and click on the Add a New App button. In the window that appears, enter the required information and click on the Create App ID button. Facebook will ask you to choose a usage scenario, but we can skip this step. Now we have an APP ID for your React Native application to access Facebook.
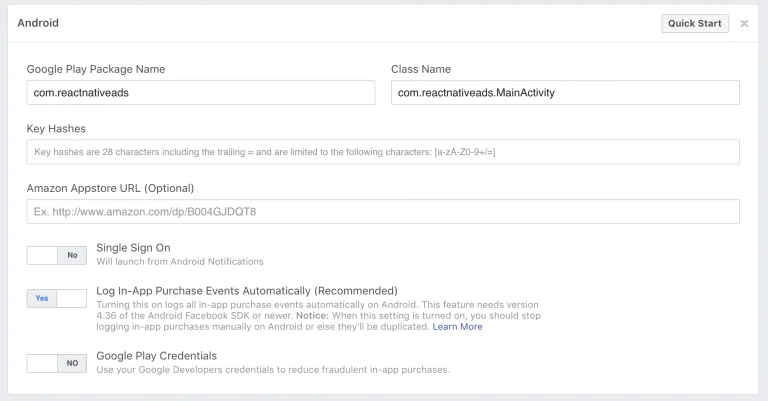
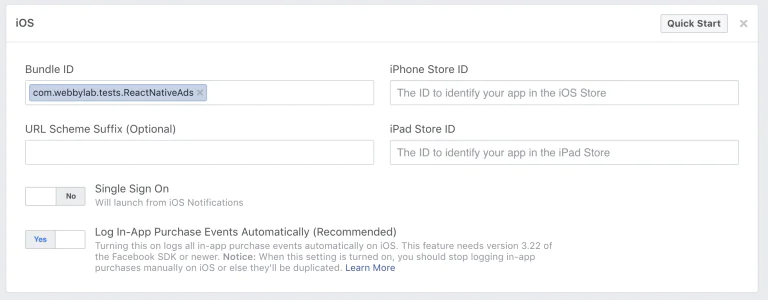
Also, Facebook must know about those applications that can access it. Therefore, in the settings of the Facebook application, you should also specify the ID of your React Native application. Facebook works directly with native applications, so you need to register an ID for each platform. It ensures the uniqueness of the application that wants to use Facebook services. Application distribution platforms (Play Market / AppStore) do not allow the appearance of two applications with identical identifiers (packageName / bundleId).
To add a platform, open the Facebook App Settings -> Basic and find the āAdd platformā button at the bottom of the page:
When the application is created in the AppStore, you will need to update the field: iPhone Store ID
How to find Android packageName
/app/src/main/AndroidManifest.xml
<manifest package="com.reactnativeads" ...>
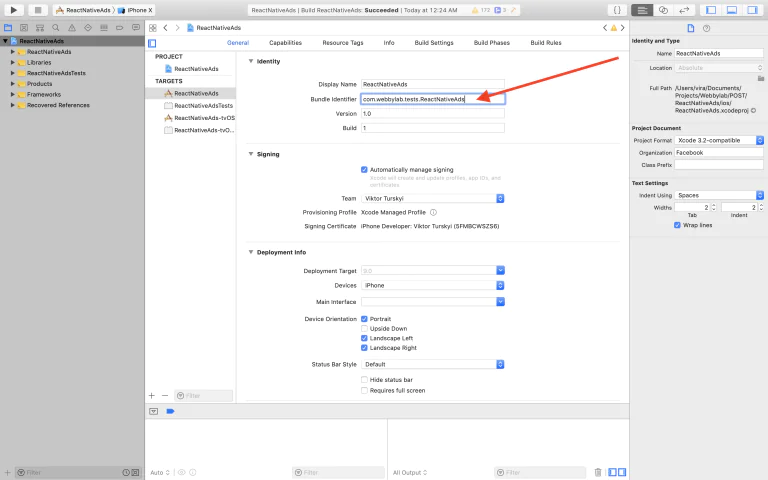
How to find iOS bundleId
The first thing you need to connect to the React Native application if you decide to use Facebook services is the Facebook SDK. You should also āregisterā the APP ID, which we received in step 1.2, in the configuration files for each platform.
To interact with the Facebook SDK, there is a react-native-fbsdk library in React Native.
You can install it by running the command in the terminal:
yarn add react-native-fbsdk
or
npm install --save react-native-fbsdk
Instructions for further connection can be found in theĀ documentationĀ for the library.Ā BUT:
!!DO NOT USE react-native link react-native-fbsdk !!
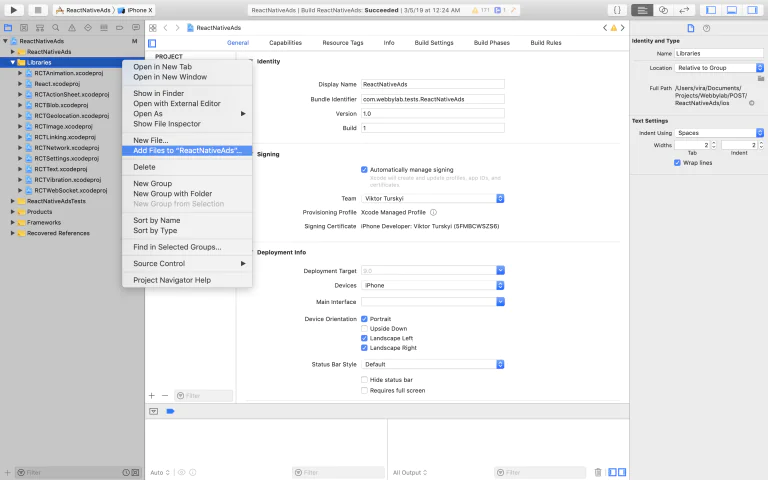
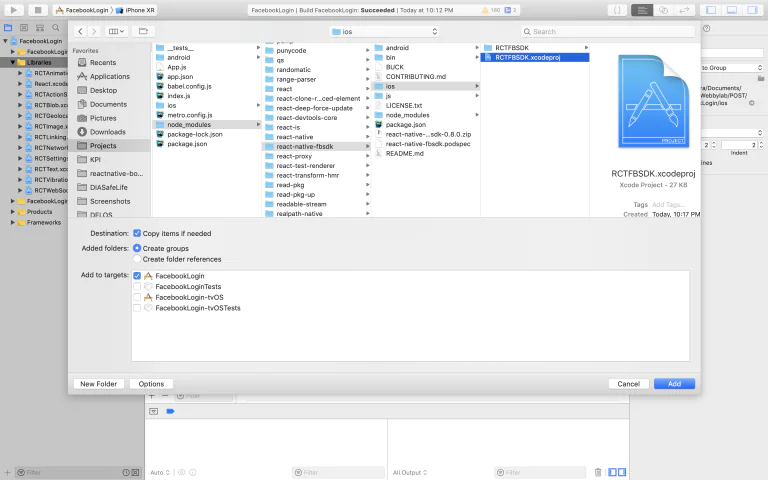
I am an adherent of manual linking libraries in React Native. So I do not recommend using the react-native link. Since using link scripts, I can never be 100% sure that my project will start and these scripts will not break anything. Moreover, manual linking is a simple operation and is usually well described in the documentation for libraries using native modules. For example, for iOS, there is a description of the manual linking process for all libraries in the general case in React Native official documentation.
In the case of the react-native-fbsdk library, the manual linking process is described in the configuration section. Following these instructions, you can easily link the library.
Setting up a Facebook APP ID in Android application
This configuration is described in the Facebook documentation, and there are links to the necessary pages in react-native-fbsdk. However, you do not need to do everything described here. Here is the āextractā from the React Native documentation.
From the official documentation, we need to perform only the Add Facebook App ID step:
In Android, we need to add the Facebook APP ID to the Android manifest. Perform the next:
<string name="facebook_app_id">Facebook App ID</string>
<application android:label="@string/app_name" ...> ... <meta-data android:name="com.facebook.sdk.ApplicationId" android:value="@string/facebook_app_id"/> ... </application>
Unfortunately, there is no description of manual linking in the documentation of the react-native-fbsdk library so that I will describe it here:
1. Download Facebook SDK
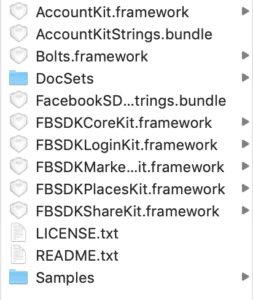
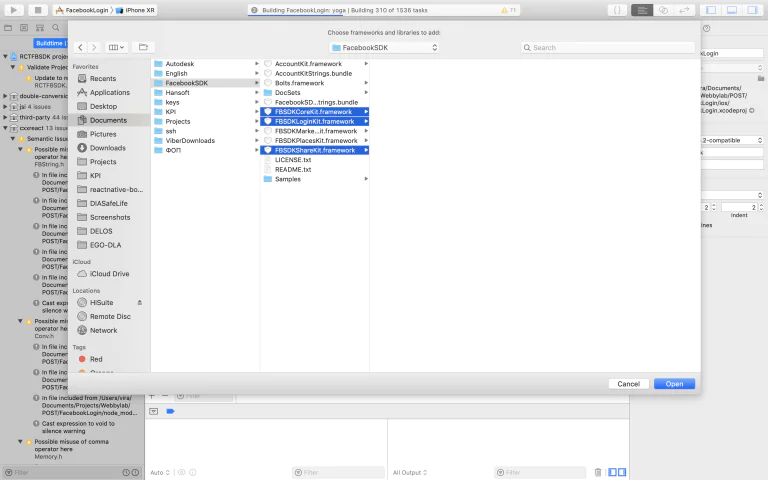
If you are setting up a Facebook SDK for iOS for the first time on your machine, make sure that you download the latest Facebook SDK from here (the āDownloadā section) with the archive and unpack it into the ~/Documents/FacebookSDK folder
It should contain something like this:
2. Link the native project
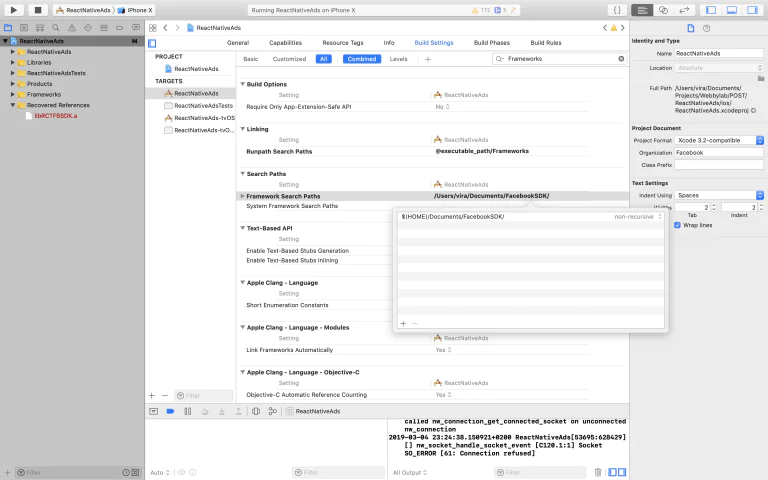
Add to PROJECT_NAME -> TARGETS -> PROJECT_NAME -> Build Settings -> Framework Search Paths the path to the Facebook SDK: $(HOME)/Documents/FacebookSDK/
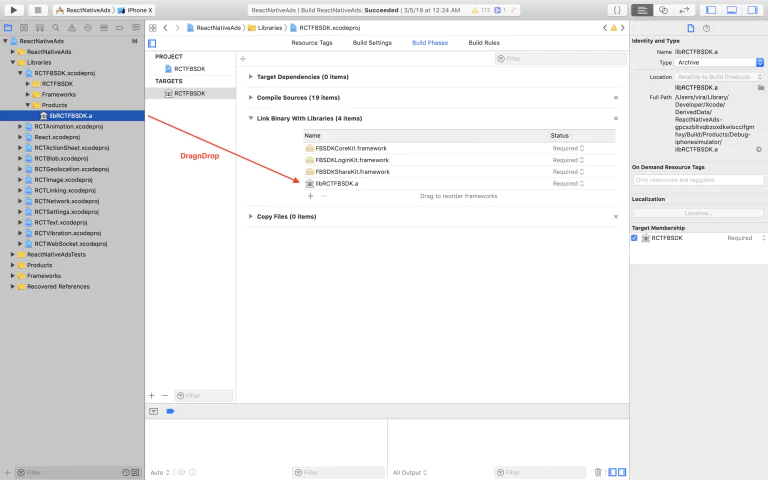
Add frameworks: FBSDKCoreKit.framework, FBSDKLoginKit.framework and FBSDKShareKit.framework to Link Binary With Libraries:
The most frequent problems
If these solutions did not help you, look in the troubleshooting section of react-native-fbsdk.
3. Register Facebook APP ID in iOS application
From the official documentation, we need to perform only the steps Configure Info.plist and Connect App Delegate:
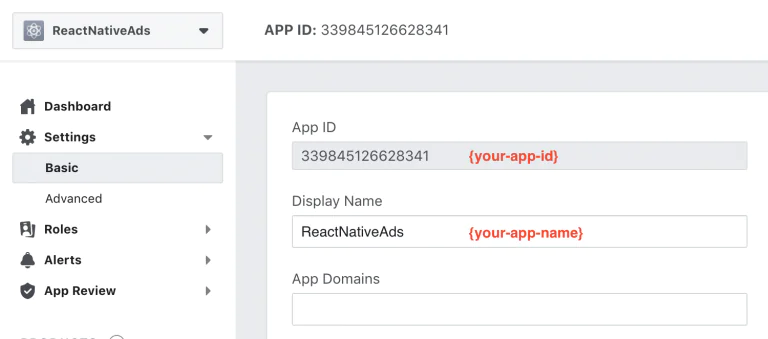
<key>CFBundleURLTypes</key> <array> <dict> <key>CFBundleURLSchemes</key> <array> <string>fb{your-app-id}</string> </array> </dict> </array> <key>FacebookAppID</key> <string>{your-app-id}</string> <key>FacebookDisplayName</key> <string>{your-app-name}</string> <key>LSApplicationQueriesSchemes</key> <array> <string>fbapi</string> <string>fb-messenger-share-api</string> <string>fbauth2</string> <string>fbshareextension</string> </array>
// AppDelegate.m #import <FBSDKCoreKit/FBSDKCoreKit.h> - (BOOL)application:(UIApplication *)application didFinishLaunchingWithOptions:(NSDictionary *)launchOptions { // You can skip this line if you have the latest version of the SDK installed [[FBSDKApplicationDelegate sharedInstance] application:application didFinishLaunchingWithOptions:launchOptions]; // Add any custom logic here. return YES; } - (BOOL)application:(UIApplication *)application openURL:(NSURL *)url options:(NSDictionary<UIApplicationOpenURLOptionsKey,id> *)options { BOOL handled = [[FBSDKApplicationDelegate sharedInstance] application:application openURL:url sourceApplication:options[UIApplicationOpenURLOptionsSourceApplicationKey] annotation:options[UIApplicationOpenURLOptionsAnnotationKey] ]; // Add any custom logic here. return handled; }
So, Facebook SDK configuration is completed, and you can start embedding various services in your application.
To begin, I propose to consider the scheme of the authorization process in the application with own backend using Facebook authentication.
Authorization setup through Facebook is well described in the official documentation for React Native.
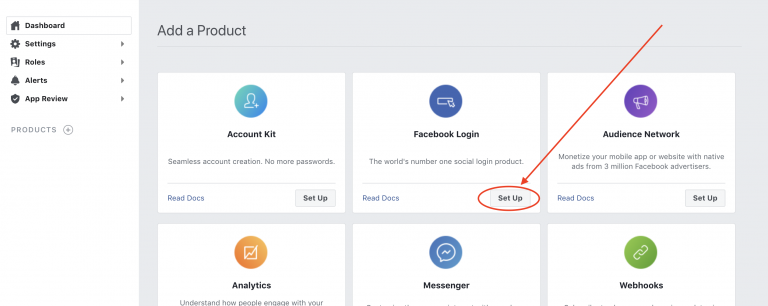
I indicate this step here to remind you that we need to connect the Facebook Login product to the Facebook console. This is an essential step in adding a Facebook login to React Native.
To make Facebook Login working in your React Native application, you need to make several more settings.
1) Add lines to /app/src/main/res/values/strings.xml:
<string name="fb_login_protocol_scheme">fb{your-app-id}</string> <string name="facebook_app_name">{your-app-name}</string>
2) And a couple of lines more in /app/src/main/AndroidManifest.xml:
<application> ... <activity android:name="com.facebook.FacebookActivity" android:configChanges="keyboard|keyboardHidden|screenLayout|screenSize|orientation" android:label="@string/facebook_app_name" /> <activity android:name="com.facebook.CustomTabActivity" android:exported="true"> <intent-filter> <action android:name="android.intent.action.VIEW" /> <category android:name="android.intent.category.DEFAULT" /> <category android:name="android.intent.category.BROWSABLE" /> <data android:scheme="@string/fb_login_protocol_scheme" /> </intent-filter> </activity> ... </application>
3) Also, you need to register Key Hashes in the platform settings in Facebook Settings. You need to register the keys for debugging as well as for release versions.
As written in the official Facebook documentation:
Facebook uses the key hash to authenticate interactions between your app and the Facebook app. If you run apps that use Facebook Login, you need to add your Android development key hash to your Facebook developer profile.
[MacOS]: To get Key Hash for development builds, you need to run this command with the password āandroidā:
keytool -exportcert -alias androiddebugkey -keystore ~/.android/debug.keystore | openssl sha1 -binary | openssl base64
Read more about Key Hashes here.
!!N.B.: to run applications on Android, you also need to register Key Hashes for the debug and release versions
File sessionUtils.js
import FBSDK from 'react-native-fbsdk'; const { LoginManager, AccessToken } = FBSDK; const PERMISSIONS = [ 'public_profile', 'email' ]; export async function getTokenFacebook() { const currentAccessToken = await AccessToken.getCurrentAccessToken(); if (currentAccessToken) { return currentAccessToken.accessToken; } const logInResponse = await LoginManager.logInWithReadPermissions(PERMISSIONS); if (!logInResponse.isCancelled) { const accessTokenObject = await AccessToken.getCurrentAccessToken(); return accessTokenObject.accessToken; } throw new Error('Cancelled'); } export async function logOutFacebook() { // async emulation return new Promise((resolve, reject) => { try { LoginManager.logOut(); setTimeout(resolve, 400); } catch (error) { reject(error); } }); }
File App.js
import React, { Component} from 'react'; import { StyleSheet, Text, View, Button } from 'react-native'; import { getTokenFacebook, logOutFacebook } from './utils/sessionUtils.js'; export default class App extends Component { state = { token : null, error : null }; handleLoginButtonPressed = async () => { try { await logOutFacebook(); const token = await getTokenFacebook(); this.setState({ token, error: null }); } catch(error) { this.setState({ error: error.message }); } } handleLogoutButtonPressed = async () => { try { await logOutFacebook(); this.setState({ token: null, error: null }); } catch(error) { this.setState({ error: error.message }); } } render() { return ( <View style={styles.container}> <Text style={styles.welcome}>Facebook Auth Token</Text> <Text style={styles.instructions}>{this.state.error || this.state.token}</Text> <View style={styles.buttonsContainer}> <Button title='Login' onPress={this.handleLoginButtonPressed} /> <Button title='Logout' onPress={this.handleLogoutButtonPressed} /> </View> </View> ); } } const styles = StyleSheet.create({ container: { flex: 1, justifyContent: 'center', alignItems: 'center', backgroundColor: '#F5FCFF', }, welcome: { fontSize: 20, textAlign: 'center', margin: 10, }, instructions: { textAlign: 'center', color: '#333333', marginBottom: 5, }, buttonsContainer : { margin : 5, minHeight : 80, justifyContent : 'space-between' } });
Results: Android/iOS
This post described the detailed process of connecting the Facebook SDK and Facebook Login to your React Native application. In general, integration consists of the following components:
The most painstaking work is to connect the Facebook SDK to the iOS application properly.
Also, I do not recommend using scripts for auto-linking libraries in React Native. Moreover, even for the library that is used to interact with the Facebook SDK, these scripts are not developed well.
The process of interaction with the Login Manager itself is described in several lines, that is good news š
Good luck!
Learn more about how we engage and what our experts can do for your business
Written by:
Team Lead, Fullstack JS developer
Vira is team lead and fullstack JS developer at WebbyLab, engaged in mobile, backend and web technologies. Love getting to know how business processes work.
How to Test React Components with Hooks & Mocks: Detailed Tutorial Having strong unit tests prevents future emergencies, urgent bug fixes, dissatisfied customers, and loss…
Introduction I want to explain the usage of this post in common use cases: case 1: web application which can send pop-up messages about something…
3 Steps to Blur Face with NodeJS and OpenCV: How to Blur Image This reading is about a task which our team had on one…
By this article, Iād like to provide you a checklist that will help you to test your product better and discover it more in-depth. Things…
How to Train Word2vec Model With NodeJS in 5 steps: Introduction This will be a really short reading about how to get a working word2vec…
How to Use Docker Compose for Automated Testing Many engineers have been confused when designing a method for isolated testing. Fortunately, today we have great…