This reading is about a task which our team had on one of our projects. This was the main goal: we had a video with real people and their faces had to be blurred to make it impossible to recognize any person on it. Today there are numerous tools and APIs that can do it for you. Google and Amazon already have ready-made solutions. But they need to be paid for and also our task was a bit more complicated because it included video processing. After a few days of research and trying different tools we decided to use opencv4nodejs for this.
OpenCV itself is a powerful software which is opensource, highly optimized and cross-platform which provides tools for machine learning. The library has more than 2500 algorithms, which include a comprehensive set of both classic and state-of-the-art computer vision and machine learning. These algorithms can be used to detect and recognize faces, identify objects, classify human actions in videos, track camera movements, track moving objects, extract 3D models of objects, produce 3D point clouds from stereo cameras, stitch images together to produce a high resolution image of an entire scene, find similar images from an image database, remove red eyes from images taken using flash, follow eye movements, recognize scenery and establish markers to overlay it with augmented reality, etc.
We used a handy wrapper of this library which provides a comprehensive collection of NodeJS bindings to the API of OpenCV. Functionality which was needed for our purpose had already implemented interface needed for our problem-solving. In this article, I will cover only the first part of this process - detecting and blurring faces on images. You will find below all steps to blur image using opencv:
First of all to blur image using opencv you will need to install dependencies. Of course one of them is OpenCV itself because it’s used by opencv4nodejs. Good for us is that it’s already included in installing of npm package. Some of the binaries will be compiled during the installation so you can meet that you will need to install some additional packages like node-gyp. On my OSX it was installed right from the first time, but when was deploying it to Ubuntu server, I had issues which actually was resolved just googling errors which I’ve received during setup. It could vary depending on your OS. Anyway, you should follow recommendations from library docs.
npm i opencv4nodejs
Other packets are related to the next steps of processing: blurring detected rectangles with human faces on the image. I’ve used these tools because they also had bindings for NodeJS. Just follow these instructions.
brew install imagemagick brew install graphicsmagick brew install imagemagick --with-webp npm install gm
Now we want to start detecting faces from images. What is needed: require opencv4nodejs for reading and preprocessing images. We will use a pre-trained model which already provided by the library. So simple code looks like this:
const cv = require('opencv4nodejs'); const image = cv.imread('/path/to/image.png'); const classifier = new cv.CascadeClassifier(cv.HAAR_FRONTALFACE_ALT2); const { objects, numDetections } = classifier.detectMultiScale(image.bgrToGray()); image.drawRectangle(rect, new cv.Vec(0, 0, 255), thickness, cv.LINE_8);
As you see just in 5 lines of code we can get rectangle coordinates of faces on the image. So, first of all, we’ve read image with cv.imread. In fact, the library also provides async API imreadAsync for this (please check here) and it is recommended to use asynchronous call not to block event loop of NodeJS. For our case with CLI which we building in this article, I’ve used the sync method just to make the example simpler.
Another line is creating instance of a classifier. Constructor CascadeClassifier accept one of provided by cv classifiers. Of course, you can train a new one using own dataset, for example how it’s described in this amazing reading. We will use ready-made HAAR_FRONTALFACE_ALT2 which let us detect face from anfas (in front). Full list of prepared classifiers includes also parts of face like eyes, mouth, full body or other objects like dishes, cars etc. Here is a full list of what the library provides:
And the last step of detection is using detectMultiScale on image instance is to get coordinates of object we were looking for on image. In our case, it was human faces. Returned values look like this:
{ 'faceRects': [ Rect { height: 70, width: 70, y: 38, x: 148 }, Rect { height: 70, width: 70, y: 51, x: 26 }, Rect { height: 63, width: 63, y: 75, x: 327 } ], 'confidences': [ 84, 88, 48 ] }
Where Rects are instances which keep the position and size area. The top left corner of the rectangle where the face was detected are x and y. Other two values: height and width represent the size of the region. That’s it – face is detected.
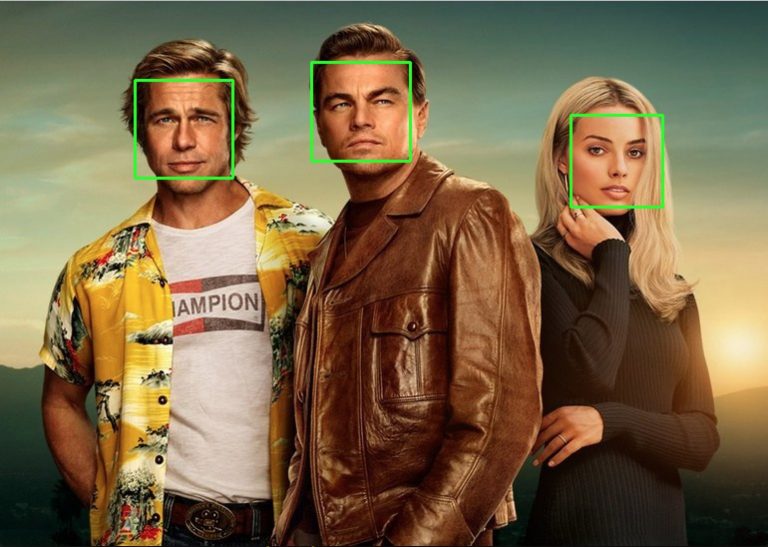
If we add to code above a few more lines we could see on the image where exactly faces were detected.
for (const object of objects) { image.drawRectangle(object, new cv.Vec(0, 255, 0), 2, cv.LINE_8); } cv.imshowWait('face detection', image);
And let’s take poster picture from “Once upon a time in… Hollywood”. Code above will open window with next image:
The last step what is left is to blur face using opencv. In fact, you can find numerous tools for this. I found easy to use for me on npm called gm. It requires installing additional dependencies to work and actually provide just NodeJS API for graphicsmagick and imagemagick. On Mac it was like this (almost the same on ubuntu using apt-get instead):
brew install imagemagick brew install graphicsmagick npm install gm
As we have already coordinates we need just pass them into a function which makes blurring for us. API of gm is really easy to use (chaining on region call which defines size and position we call blur function):
const gm = require('gm'); const img = gm('/path/to/image.png'); img.size((err, value) => { img.region(width, height, left, top).blur(25, 45); img.write('/path/to/blurred_image.png', (err) => { if (err) console.error(err); } }) })
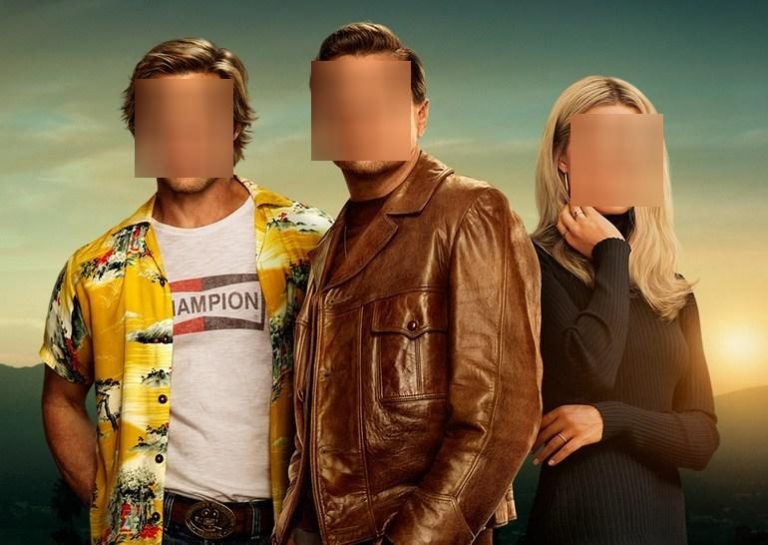
Numbers which was passed to blur are specifying the radius and optional sigma (standard deviation). Playing with them you will see the difference with the level of blurring. As a result, we get the next image where faces of people on it are anonymized:
Before image blurring with nodejs:
After face blurring using opencv:
Feel free to use my code with all examples we have here for NodeJS part. I’ve made for this simple CLI tool which let you blur faces on image and use code from examples https://github.com/unsigned6/face_detection. Here is a description how to use it:
Usage: node face_detection.js <path_to_image>
Hope you had enjoyed opencv blur faces opencv4nodejs and will try to use it with different images. Please feel free change classifiers, change blur function to something else (maybe you can build you own Snapchat filter, who knows?). Also, you see now that with the power of NodeJS and opensource you can do almost anything with javascript easily and play with different subjects which cover from now not only WEB but also topics like ML, image and video processing.
Learn more about how we engage and what our experts can do for your business
Written by:
Technical Lead at 2Smart
Software developer with almost 6 years of experience, interested in smart-home products and learning new technologies
By this article, I’d like to provide you a checklist that will help you to test your product better and discover it more in-depth. Things…
Do you know that only 26% of IT projects are completed on time and budget, 46% are late or over budget, and 28% fail? Failure…
How to Test React Components with Hooks & Mocks: Detailed Tutorial Having strong unit tests prevents future emergencies, urgent bug fixes, dissatisfied customers, and loss…
In this guide, we provide you with comprehensive information on how to enable Facebook login in the React Native application, a description of the process…
How to Train Word2vec Model With NodeJS in 5 steps: Introduction This will be a really short reading about how to get a working word2vec…
How to Use Docker Compose for Automated Testing Many engineers have been confused when designing a method for isolated testing. Fortunately, today we have great…