Testing React Components with Hooks & Mocks [Full Guide]
![Testing React Components with Hooks & Mocks [Full Guide]](https://webbylab.com/wp-content/webp-express/webp-images/uploads/2022/09/v3-768x260-1.png.webp)
How to Test React Components with Hooks & Mocks: Detailed Tutorial
Having strong unit tests prevents future emergencies, urgent bug fixes, dissatisfied customers, and loss of company reputation. Testing with React testing library also reduces time spent debugging: the analysis required to trace back to the line of code in question to apply the appropriate correction. The worst-case scenario is having to run the entire application in “debug mode” to track down the faulty code. A good unit test targets specific code sections and validates their behavior.
Unit tests provide quick feedback, in a few tens of seconds. So much so that they have been systematized by the principles applied in practices such as Planning/Feedback loops:
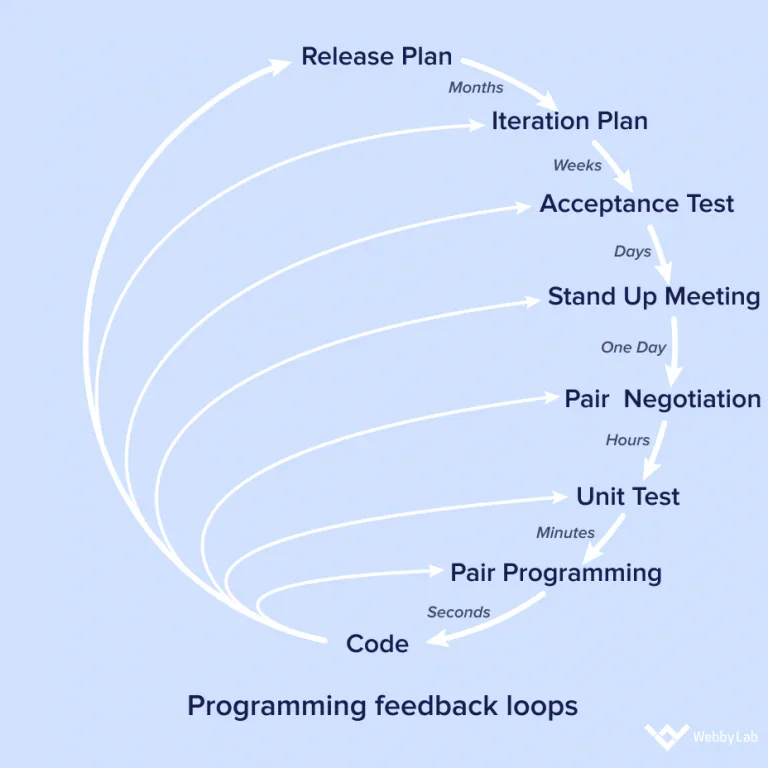
Source: AT Internet
To improve the return on investment (ROI) of our testing strategy “shift left” approach should be used. This approach aims to shift test operations “to the left” to be carried out as early as possible in the development cycle. We have to increase the effort to detect defects in the unit test phase, which enables us to limit the costs generated in the rest of the cycle:
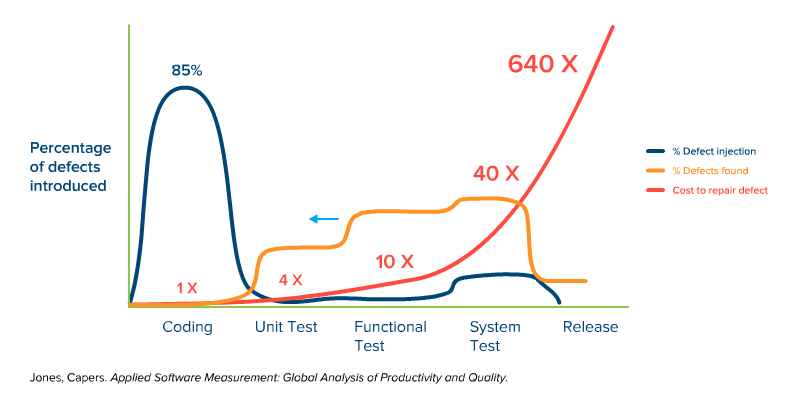
Source: AT Internet
The picture above shows different test levels. Each test level is important and necessary to ensure the quality we want for our customers, but we should constantly evaluate our investments to avoid being swamped by unexpected expenses.
Jest, Enzyme, react-testing-library
Jest is a JavaScript testing framework designed to ensure the correctness of any JavaScript codebase. I used it to mock API requests, test functions, and react hooks. The Jest test components can collect code coverage information from entire projects, including untested files.
Enzyme is a JavaScript Testing utility for React that is based on testing components with focusing on its implementation details like state and props. Enzyme is compatible with all major test runners and assertion libraries. So it means you feel free to choose mocha or chai as your test runner.
The React Testing Library is a very lightweight solution for testing React components with hooks. It provides light utility functions on top of react-dom and react-dom/test-utils, in a way that encourages better testing practices.
The main difference between Enzyme and React Testing Library (RTL) is the implementation details of a React Component because Enzyme leaves us a possibility to test components as React components. For example, we can find an element by its defined name and call props() method which is very convenient whereas RTL focuses on rendering the DOM tree as it would be rendered for the end-user. In this case, we cannot find a React component directly, we should search for an HTML element this component rendered and check content depending on the props we passed or find elements depending on a text it has. It’s a more complicated approach but I think it’s more reliable. In the next sections will be presented tests using both libs.
Configuration of your environment
As a common template of react app, I’ve decided to use create-react-app. It has the installed Jest library under the hood.
npx create-react-app my-appcreate-react-app has an installed react-testing-library under the hood, the enzyme should be installed as a separate library.
npm i --save-dev enzyme @wojtekmaj/enzyme-adapter-react-17Enzyme configuration
npm i --save-dev enzyme @wojtekmaj/enzyme-adapter-react-17Then go to inside src/setupTests.js. Set the next configuration inside:
import { configure } from 'enzyme';
import Adapter       from '@wojtekmaj/enzyme-adapter-react-17';

configure({ adapter: new Adapter() });
Mocks
Testing react with mocks is always a required part of writing tests because you should isolate the block of code from remote requests, modules, logic in hooks and replace them with mocks. As an example, I took a component that fetches and displays a user profile.
App.js
import Profile from './components/Profile';
import Loader  from './components/Loader';
import ErrorHandler from './components/ErrorHandler';
import useFetch from './hooks/useFetch';

function App() {
   const { response, error, loading, fetchData } = useFetch('https://randomuser.me/api');

   const handleFetch = () => {
       if (!loading) {
           fetchData();
       }
   };

   return (
       <div classname="App">
           {response ? <profile data="{response.results[0]}"> : null}
           {loading ? <loader> : null}
           {error ? <errorhandler error="{error}"> : null}
           <button onclick="{handleFetch}">Fetch</button>
       </errorhandler></loader></profile></div>
   );
}
useFetch.js
import React from 'react';
import api from '../singleton/api';

const useFetch = (url, options) => {
   const [ response, setResponse ] = React.useState(null);
   const [ error, setError ] = React.useState(null);
   const [ loading, setLoading ] = React.useState(false);

   const fetchData = async () => {
       try {
           setLoading(true);
           const res = await api.apiClient.get(url, options);

           setResponse(res);
       } catch (err) {
           setError(err);
       } finally {
           setLoading(false);
       }
   };

   React.useEffect(() => {
       fetchData();
   }, []);

   return { response, error, loading, fetchData };
};
I have highlighted parts that should be mock as it has remote requests and hooks that have to have a predictable response for us. Components like Loader.js, Error.js and Profile.js have only mark up. They will not be covered by tests in this article. Let’s start with useFetch.js because in my experience It’s better to move from the bottom to the top. And also it is a good chance to show how to test react functions with hooks. So I will test everything App.js uses and then test App.js itself.
useFetch.test.js
import React       from 'react';
import mockUser    from '../__mocks__/user'; // 1
import api         from '../singleton/api';

jest.mock('../singleton/api', () => ({ apiClient: { get: jest.fn() } }));

describe('Test hook useFetch', () => {
   const setResponse = jest.fn(); // 2
   const setError = jest.fn();
   const setLoading = jest.fn();

   // useState indexes
   const responseIndex = 0;
   const errorIndex = 1;
   const loadingIndex = 2;
   const useStateMocks = {
       [responseIndex] : [ null, setResponse ],
       [errorIndex]    : [ null, setError ],
       [loadingIndex]  : [ false, setLoading ]
   };

   beforeEach(() => {
       api.apiClient.get.mockImplementation(() => Promise.resolve(mockUser)); // 3

       let useStateIndex = 0;

       jest.spyOn(React, 'useState').mockImplementation(() => { // 4
           const useStateMock = useStateMocks[useStateIndex];

           useStateIndex++;

           return useStateMock;
       });

       // We should mock it because useEffect is not supported by Enzyme's shallow rendering.
       jest.spyOn(React, 'useEffect').mockImplementation(f => f()); // 5
   });

   ...
});
- I imported an object with a user that I should receive from the backend if I had real conditions. I recommend creating a src/__mocks__ folder for all entities you are fetching from the backend for testing and saving mocks there.
- I created mock functions. They allow us to understand how many times a function in the hook will be called and which parameters will be passed to the function.
- Also a mock function but with implementation for testing.
- jest.spyOn is a method very similar to jest.fn but it’s used to track calls to object[methodName]. In this case, I set the implementation of React.useState, and depending on the call index I return different implementations for handling error, loading, and remote response.
- I should mock it because react test useEffect is not supported by Enzyme’s shallow rendering. Will be fixed in the next version of Enzyme.
Let’s create a mock of useFetch that can be used for testing in App.js.
App.test.js
import useFetch from './hooks/useFetch';
import mockUser from './__mocks__/user';

const mockFetchData = jest.fn();
const mockError = new Error('User is not found');

jest.mock('./hooks/useFetch.js', () => jest.fn()); // 1

describe('Test App.js', () => {
   beforeEach(() => {
       useFetch.mockImplementation(() => ({ // 2
           response  : null,
           error     : null,
           loading   : false,
           fetchData : mockFetchData
       }));
   });

   it('Should render a Profile component', () => {
       useFetch.mockImplementation(() => ({ response: mockUser })); // 3

       ...
   });

});
- Point the module that needs to be mocked
- Set an implementation
- Update the implementation depending on the test
That is all we need to start react testing with mocks now and check two different approaches in future sections. More about mocks you can find in the official Jest documentation.
Let’s explore how proper testing can make your React apps more reliable
Meet ExpertsTesting with Enzyme
Enzyme has three methods for testing components.
Shallow rendering is used when you need to test your component as an independent unit. It does not render child elements that your component contains. For example, if in the App component you have a Table component you will see only its name (Table) and props it has without implementation.
Full rendering using Mount is usually used to test a component wrapped in HOC or for use cases where you have components that may interact with DOM APIs. It renders all elements that component has with child components.
Static Rendering is used to generate HTML from your React component. It looks like a very similar approach that RTL uses but with limitations in selecting items. Enzyme uses third-party library Cheerio with the lean implementation of core jQuery for parsing and manipulating HTML.
Components observed in the previous section I’m gonna test using the Shallow method because we consider unit testing and this approach perfectly fits this case. We start from the hook. The code below shows how to test react with hooks using Enzyme.
useFetch.test.js
it('Should fetch a value', async () => {
       shallow(<testusefetchhooks>);

       await new Promise(process.nextTick); // 1

       expect(setLoading).toHaveBeenCalledTimes(2);
       expect(setLoading).toHaveBeenCalledWith(true);
       expect(setLoading).toHaveBeenCalledWith(false);

       expect(setResponse).toHaveBeenCalledTimes(1);
       expect(setResponse).toHaveBeenCalledWith(mockUser);
   });

   it('Should throw an error during fetching', async () => {
       const mockError = new Error('User is not found');

       api.apiClient.get.mockImplementation(() => Promise.reject(mockError));

       shallow(<testusefetchhooks>);

       await new Promise(process.nextTick);

       expect(api.apiClient.get).rejects.toThrow(mockError);

       expect(setLoading).toHaveBeenCalledTimes(2);
       expect(setLoading).toHaveBeenCalledWith(true);
       expect(setLoading).toHaveBeenCalledWith(false);

       expect(setError).toHaveBeenCalledTimes(1);
       expect(setError).toHaveBeenCalledWith(mockError);
   });
1 — To make Jest wait till all asynchronous code will be executed.
App.test.js
it('Should render a Profile component', () => {
       useFetch.mockImplementation(() => ({ response: mockUser }));
       const wrapper = shallow(<app>);

       expect(wrapper.find(Profile)).toHaveLength(1);
       expect(wrapper.find(Profile).props().data).toBe(mockUser.results[0]);
   });

   it('Should trigger fetchData if loading is false', () => {
       const wrapper = shallow(<app>);

       wrapper.find('button').simulate('click');

       expect(mockFetchData).toHaveBeenCalledTimes(1);
   });

   it('Shouldn\'t trigger fetchData if loading is true', () => {
       useFetch.mockImplementation(() => ({ loading: true }));
       const wrapper = shallow(<app>);

       wrapper.find('button').simulate('click');

       expect(mockFetchData).toHaveBeenCalledTimes(0);
   });

   it('Should render a Loading component', () => {
       useFetch.mockImplementation(() => ({ loading: true }));
       const wrapper = shallow(<app>);

       expect(wrapper.find(Loader)).toHaveLength(1);
   });

   it('Should render a ErrorHandler component', () => {
       useFetch.mockImplementation(() => ({ error: mockError }));
       const wrapper = shallow(<app>);

       expect(wrapper.find(ErrorHandler)).toHaveLength(1);
       expect(wrapper.find(ErrorHandler).props().error).toBe(mockError);
   });
100% coverage was reached using the shallow method of Enzyme. I hope you already understand how to test react components with hooks but we will have one more approach so keep reading. Tests written using shallow words give a good representation of what a component should do, which I think is the great advantage of Enzyme.
Testing with React Testing Library
Depending on the testing library, testing react hooks can be done in a few ways. In this section, you will see how to test hooks using the tools of react-testing-library. For testing a hook I used the testing library react hooks @testing-library/react-hooks as it was developed by the same team that is responsible for creating react-testing-library, and it shows a bit of another approach of how to test react hooks. It’s not required. You can leave the same approach as I showed in a previous section.
useFetch.js
import mockUser    from '../__mocks__/user';
import useFetch    from './useFetch';
import { renderHook, act } from '@testing-library/react-hooks';
import api from '../singleton/api';

jest.mock('../singleton/api', () => ({ apiClient: { get: jest.fn() } }));

describe('Test hook useFetch', () => {
   beforeEach(() => {
       api.apiClient.get.mockImplementation(() => Promise.resolve(mockUser));
   });

   it('Should fetch a value', async  () => {
       const { result } = renderHook(() => useFetch());

       await act(async () => {
           await result.current.fetchData()
       });

       expect(result.current.response).toBe(mockUser);
   });

   it('Should throw an error during fetching', async () => {
       const mockError = new Error('User is not found');

       api.apiClient.get.mockImplementation(() => Promise.reject(mockError));

       const { result } = renderHook(() => useFetch());

       await act(async () => {
           await result.current.fetchData()
       });

       expect(result.current.error).toBe(mockError);
   });
});
As you can see this approach is clearer than the previous one because we deleted most of the mocks and can explicitly check the result of the hook execution. Let’s see how App.test.js is updated.
App.test.js
it('Should render a Profile component', async () => {
       useFetch.mockImplementation(() => ({ response: mockUser }));
       render(<app>);
       const { title, first, last } = mockUser.results[0].name;
       const name = `${title} ${first} ${last}`;
       const img = await screen.findByAltText(name);

       expect(await screen.findByText(name)).toBeInTheDocument();
       expect(img.src).toBe( mockUser.results[0].picture.large);
   });

   it('Should trigger fetchData if loading is false', () => {
       render(<app>);

       fireEvent.click(screen.getByText('Fetch'));

       expect(mockFetchData).toHaveBeenCalledTimes(1);
   });

   it('Shouldn\'t trigger fetchData if loading is true', () => {
       useFetch.mockImplementation(() => ({ loading: true }));
       render(<app>);

       fireEvent.click(screen.getByText('Fetch'));

       expect(mockFetchData).toHaveBeenCalledTimes(0);
   });

   it('Should render a Loading component', async () => {
       useFetch.mockImplementation(() => ({ loading: true }));
       render(<app>);

       expect(await screen.findByText('Loading...')).toBeInTheDocument();
   });

   it('Should render a ErrorHandler component', async () => {
       useFetch.mockImplementation(() => ({ error: mockError }));
       render(<app>);

       expect(await screen.findByText(mockError.message)).toBeInTheDocument();
   });
Here, I’ve highlighted new methods that are used to get elements findByText, getByText, findByAltText. As you can see, the main difference as I mentioned before is the absence of access to React components. We work with the final result (HTML) and should check the content we received as end-user. The methods I used are not all. You can find the whole list in the documentation with a detailed explanation. RTL has enough methods to find any element in a DOM tree you want to test. In most difficult cases you can use the getByTestId method that returns your element marked with an attribute data-tested.
Conclusion
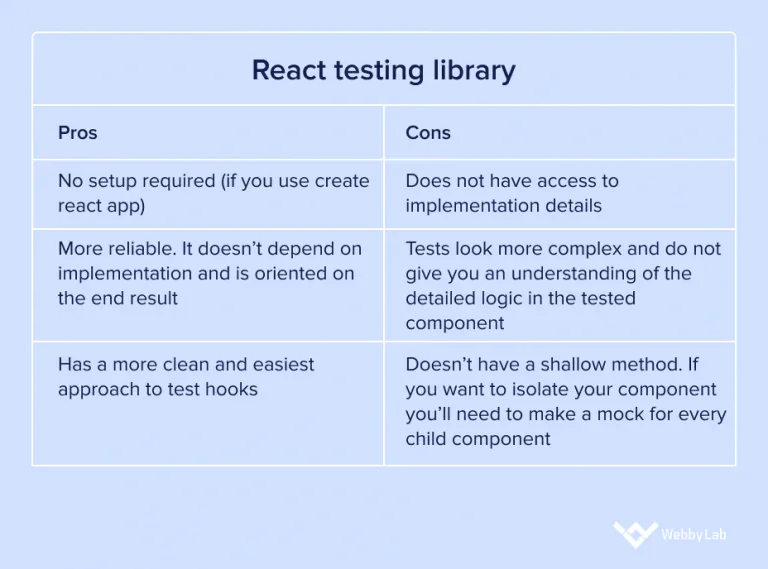
For now, you have an idea of how to test react hooks using both libs. I made tables where I gathered their pros and cons.

To sum up, I worked with both of these libs. Now I write tests using react-testing-library. In my opinion, tests should only check the final result of your logic and be independent of the implementation details. However, I cannot say that Enzyme is a bad variant to test your code since it offers convenient tools to write understandable tests that you can use as documentation between developers. And as a result, it facilitates onboarding. Besides this, I would say that writing tests using Enzyme takes less time than writing the same tests using RTL. If I chose the lib for the next project I would be oriented on the size of the project: for small-medium size projects that take up to one year is better to use Enzyme and for mid-large size projects the better choice is RTL.
When working on complex and scalable custom IoT development solutions, selecting the right testing framework is crucial to ensuring reliability, performance, and maintainability.


Written by:

Max Koldun
JS developer
I am involved to develop applications in React and also have experience with Nodejs. Usually spend my time reading books, jogging, cycling, hiking, and always open to new experience.

FAQ
Why hooks in React are essential for testing?
Because hooks are essential for modern react development they are used in every react project nowadays. Tested hooks save teams from unpredictable bugs.
What are the best practices for testing React components that use hooks?
1. Do not test implementation details of hooks. Test API that hooks provide.
2. Try to avoid using mocks until it is completely necessary.
3. Test hooks in isolation without involving any components.
How do I test a component that uses the useEffect hook in React?
You should not try to mock useEffect (mocking is only needed for Enzyme shallow rendering). Usually you need to wait until async side effects in use effect hooks will be completed. For this purpose i recommend to use waitFor [https://testing-library.com/docs/dom-testing-library/api-async/#waitfor] it will wait for async functions to complete before continuing the code. If you do not have async side effects, waitFor is not needed. In the end of your test you need to use expect to check useEffect impact on the component.
I can't test the React components, can you help me with this?
Yes, I would recommend you to check my article. It has setup instructions for react-testing-library. Also I would recommend checking the documentation of react-testing-library.