Google Chrome payment plugins: a guide to popular browser extensions

Modern software development practices often contain just the most basic features in the core program, with additional functionality supplied via add-ons such as plugins. Browser plugins are a good example of this concept in action. In this article, we will learn more about the Google Chrome payment extensions, which will allow you to use them accurately when developing software.
If you have difficulties with the implementation of payment components in your software or mobile application, you can also read our other articles or cases in which we have already solved such problems.
What is a plugin?
A plugin (or plug-in) is third-party software that provides additional functionality to a computer’s host program without modifying it. Therefore, it lets you introduce extra components or expand its capabilities beyond what it was designed for. Plugins are also known as add-ons or extensions.
What are Chrome plugins? Some basics, benefits & examples
Chrome plugins are shortcuts to programs available on Google Chrome plugin pages. By clicking a “plugins” button on the browser’s toolbar, you can see the plugins menu of third-party apps and Google Chrome extensions (including Chrome extensions for payments) that can be used to customize how users access and interact with the web.
Extensions for Chrome are built using web technologies like HTML, JavaScript, and CSS. Plugins interact with the Chrome browser while running in a separate, sandboxed execution environment. They allow users to “extend” the browser by modifying browser behavior and accessing web content via APIs. For instance, AdBlock is a Chrome extension that allows the browser to block ads.
Plugins are supported by browsers for various purposes, including allowing third-party developers to provide particular functionalities, add new features, and enhance functionality.
In terms of browser plugins advantages, the following should be outlined:
- quick access
- easy-to-use controls
- incorporation of its features into products that do not have access to the core
- ability to bring together systems and cloud storage in a single workspace
Besides, the Google Chrome extensions make your internet browser more productive, reduce distracting issues, and provide more source content.
Payment plugin integration
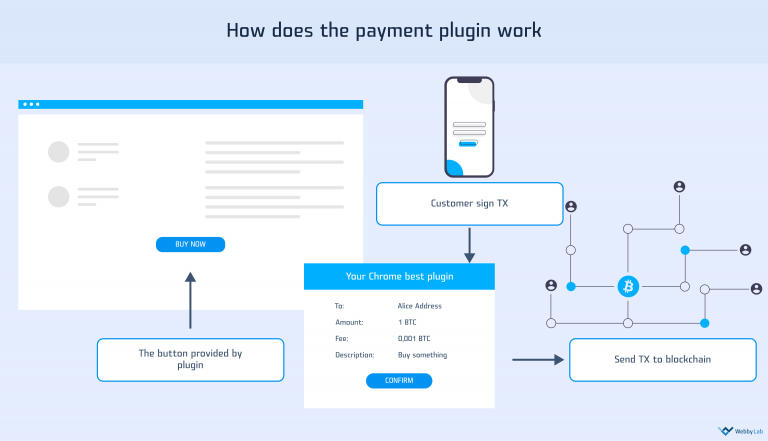
Payment processing is critical for every online store, so a payment plugin is an attractive solution for integrating this functionality into your website.
Payment plugins allow you to process payments on the webpage. By integrating the Chrome payment extension into your e-commerce website, you make the payment process run more smoothly. This also adds to your business’s competitive advantage since you provide a better service because your clients aren’t pushed to switch to another site to make a payment.
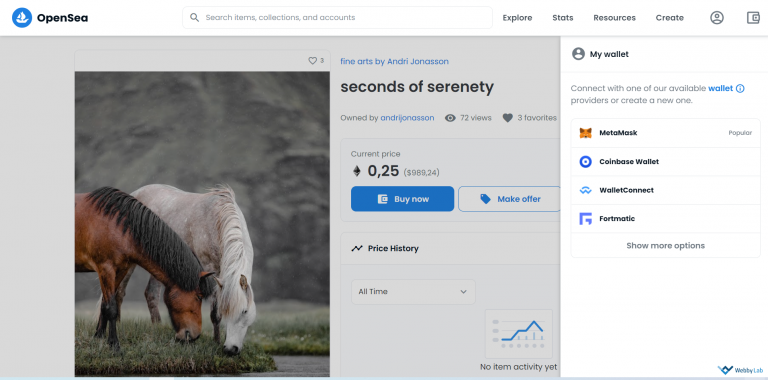
Opensea, which is a marketplace for NFTs, rare digital items, and crypto-collectibles can serve as a good example of a webpage integrated with a payment plugin. The platform uses Metamask, which is a payment processing extension acting as a link between a browser and the Ethereum blockchain:
Read Also: eCommerce Ecosystem: Everything You Need to Know
Overview of some popular Chrome payment plugins
Chrome Web Store provides multiple payment plugins that can improve user experience and enhance the website’s performance. They have already entered our lives and gained a great deal of popularity as well. Here are some of them:
MetaMask
MetaMask is a free payment extension that allows users to store and exchange cryptocurrency, interact with Ethereum and host decentralized applications (dApps).
Tronscan
TronScan is an integrated web wallet that allows you to transfer, receive, and manage TRON tokens and dApp interactions throughout the network.
FROST — Paypal for the Blockchain
Frost is a cutting-edge Chrome extension for payments that allows you to transmit, receive, and buy cryptocurrency.
BOLT X
Bolt X plugin injects an object into the javascript context of every website so that decentralized apps can connect with your wallet and you can interact with the app.
Liquality Wallet
Liquality Wallet is a Chrome browser extension with built-in one-click atomic swaps that supports several blockchains and provides the simplest way to switch between BTC, ETH/ERC20s, and RSK tokens.
Have a plugin idea but unsure how to bring it to life? Contact us, and we’ll build a custom Chrome extension tailored to your needs
Get a consultationIs it worth investing in plugins?
A plugin that perfectly complements the capabilities of your webpage can give it more functionality. Tippin, one of the payment plugins, is yet another piece of evidence for this. Generally, Tippin (tippin.me) is a Chrome extension that enables Twitter users to send and receive Bitcoin payments via the Lightning Network. It permits you to receive just tips, which you should then transfer to a wallet to spend. Another option is to utilize the LightningJoule plug-in, which is also available for Chrome. This extension requires you to operate your own lighting node, but it also enables invoicing and payment for services other than tipping, and you retain ownership of your keys.
Plugins also have expanded basic functionality, allowing the following:
- Integration with Explorer
- ERC20 integration with contracts
- Generating seed phrases
- Using BIP-44 standard to work with multiple currenciesдля and various accounts
- Sending and receiving funds
- Checking the balance and transaction history
Because of their simplicity and functionality, the use of plugins is becoming increasingly widespread. Whether you have a plugin idea but are not sure about the optimal way to implement it, contact us, and we will create a Chrome extension for you.
It will take roughly 1500 hours for WebbyLab professionals to develop a plugin that will fit the above-mentioned requirements. Due to our expertise in plugin development, we will find the right solution for you and deliver it on time.


Written by:

Alexey Krol
Chief Business Development Officer at Webbylab
Building bridges between experts, who deliver outstanding solutions, and companies willing to implement modern technologies to grow their business.

FAQ
How secure are Chrome payment extensions?
Chrome payment extensions can be secure if they are developed by trustworthy and reputable companies, and if they follow best practices for security. However, there is always a risk of data breaches or malicious code injection that could compromise the security of your payment information. It’s important to do your research and only use payment extensions from trusted sources like blockchains.
What are the benefits of using a Chrome payment extension?
The benefits of using a Chrome payment extension include the ability to securely and conveniently make online purchases without having to manually enter your payment information each time. It can also help to protect your payment information from keyloggers and other types of malware that could steal your information.
How do I troubleshoot issues with a Chrome payment extension?
If you’re experiencing issues with a Chrome payment extension, there are a few troubleshooting steps you can take. First, try disabling and re-enabling the extension, or uninstalling and reinstalling it. You should also check that you’re using the most up-to-date version of the extension and that it’s compatible with your version of Chrome. If the issue persists, you may need to contact the developer for further assistance.