PIJET: Parallel, Isolated Jest-Enhanced Testing Part III: Test Isolation Methods
Explore Advanced Test Isolation Strategies in Node.js with PIJET.


Abstract
In the fast-paced realm of software testing, ensuring test isolation in parallel environments is paramount for accurate and efficient outcomes. This article delves into advanced isolation methodologies within the PIJET framework for Node.js projects. Each method’s unique approach to managing isolation in parallel testing through Jest is critically examined. A comparative analysis sheds light on the practicality and efficacy of these methods. This article aims to equip software developers and test engineers with a thorough understanding of isolation strategies, enhancing their testing practices in parallel execution environments.
Introduction
In the competitive arena of software development, Node.js has emerged as a mainstay for crafting efficient network applications. With this ascent, the need for sophisticated end-to-end (E2E) testing strategies has never been more acute. A cornerstone of such strategies is test isolation—a concept that, while simple in theory, presents multifarious challenges in the realm of parallel test execution. The essence of this quandary lies in the interference of concurrently running tests, which can lead to false positives and obscure the detection of faults.
This article sets out to demystify the intricate landscape of test isolation within the framework of Parallel, Isolated, Jest-Enhanced Testing (PIJET). We address the perennial problem of test crosstalk by dissecting two pivotal isolation strategies: transactional test execution and database reset strategy. With a meticulous eye, we unveil the theoretical frameworks underpinning these strategies, scrutinize the technical challenges they entail, and illuminate the distinct advantages they hold. Our investigation does not stop at traditional methodologies; it extends to the vanguard of testing techniques, introducing mocking database connections and connection driver strategies as innovative conduits to isolation.
By the end of this exposition, we will have navigated through the labyrinth of Jest parallelism and its implications for each isolation method. Through a critical comparative analysis, we aim to distill clarity from complexity, providing practitioners with actionable insights and recommendations.
Section I: Transactional Test Execution
Theoretical Basis
The philosophy behind transactional tests is rooted in the concept of maintaining a pristine test environment. The approach is straightforward: for each test, a unique database transaction is initiated. Within this encapsulated transaction, the test performs all its operations—inserts, updates, deletes—safe in the knowledge that none of these changes will persist beyond the test’s execution. Once the test concludes, the transaction is rolled back, irrespective of success or failure, reverting the database to its previous state. This rollback is a pivotal moment, as it ensures that subsequent tests encounter a database unaltered by earlier tests, thereby eliminating any chance of cross-contamination between tests.
This rollback mechanism is what sets transactional tests apart, providing an automatic cleanup process that is both efficient and reliable. It sidesteps the need for manual database refreshes or complex state management, streamlining the testing process and guaranteeing that each test can be run in isolation, and in any order, without fear of conflicting interactions.
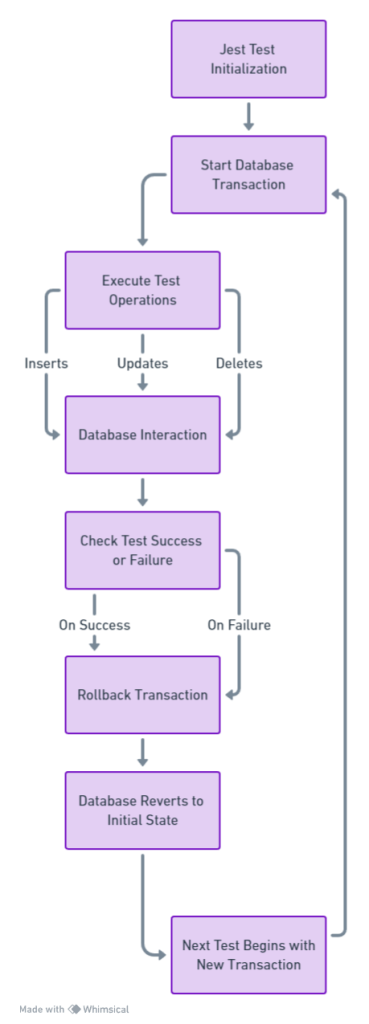
Fig 1. Transactional Test Execution Flowchart
Case Studies
In the realm of transactional tests, the underlying database system can dramatically influence the testing process. MySQL and PostgreSQL, with their strict adherence to ACID properties, offer a transactional integrity that is indispensable for tests requiring a steadfast rollback capability. They provide a robust safety net for E2E testing, where each test’s aftermath must be wiped clean to ensure absolute isolation.
PostgreSQL stands out with its meticulous transaction controls, such as savepoints, which can offer granular rollback capabilities within a single test transaction. This can be particularly useful for complex test scenarios where multiple stages of rollback are necessary.
MySQL, with its engine versatility, allows for fine-tuning transactional behavior. For instance, the non-transactional MyISAM engine contrasts sharply with the transactional InnoDB, which is crucial for designing transactional tests that align with the expected production environment.
MongoDB, on the other hand, introduces transactions with nuances of its own. As a document-oriented database, it allows for transactions across multiple documents. However, these transactions, especially when nested deeply, can exhibit performance impacts that necessitate careful test design. They may also introduce complexity when handling rollbacks, as the document-based model does not naturally align with the row-based transactions of SQL databases.
When designing transactional tests, one must weigh these technical differences, adapting the testing strategy to fit the database’s behavior to ensure that the tests remain both performant and reliable.
Technical Drawbacks
Transactional testing, while invaluable for ensuring test isolation, presents a suite of technical challenges that merit careful consideration:
- Constraint and Index Evaluation: Within the ephemeral realm of a transaction, certain database behaviors like unique constraint violations and index operations remain dormant until commit. This peculiarity can mask potential integrity issues, as these constraints are not actively enforced during the test’s rollback process.
- Deferred Constraints and Triggers: Some databases defer constraint checks and trigger executions to the transaction’s end, potentially leading to a false sense of security in tests, as these critical checks and actions are bypassed in rollback scenarios.
- Database Locks and Deadlocks: Engaging in transactional testing can inadvertently lead to table or row locks, particularly in relational databases. This phenomenon not only risks deadlocks but also can skew test outcomes due to unanticipated waiting times or resource conflicts.
- Performance Implications: The overhead associated with initiating and rolling back transactions, especially in databases where such operations are less optimized, can introduce performance bottlenecks, distorting the test environment’s reflection of real-world scenarios.
- Isolation Level Nuances: Different transaction isolation levels bring about varied phenomena like phantom reads, which might not be congruent with the production environment’s settings, leading to inconsistent test results.
- Limitations with Non-Transactional Databases: Implementing transactional tests in databases not primarily designed for transactional operations can be fraught with limitations, lacking comprehensive coverage of the database’s full functionality.
- Complexity in Contextual and Nested Transactions: Configuring contextual and nested transactions presents a significant challenge in many ORM (Object-Relational Mapping) and ODM (Object Document Mapping) systems. This complexity often becomes a curse, as developers grapple with intricate configurations and potential inconsistencies in transaction management, further complicating the testing landscape.
Advantages
Transactional test execution, despite its challenges, brings a host of significant advantages to the table, particularly in the context of end-to-end testing.
- Precision and Clean State Maintenance: The most striking benefit lies in its ability to maintain a clean state. By wrapping each test in a transaction and rolling it back upon completion, transactional testing ensures that each test starts with a database in its initial, unaltered state. This precision is crucial for tests that demand a high degree of accuracy and repeatability.
- Efficiency in Setup and Teardown: Transactional tests streamline the setup and teardown process. Traditional testing methods often require extensive scripts to reset the database to a known state. In contrast, transactional tests achieve this with a simple rollback, saving valuable time and resources, especially in large test suites.
- Isolation and Independence: Each test runs in its isolated transaction, unaffected by side effects from other tests. This isolation is particularly beneficial in parallel testing environments where tests run concurrently, as it ensures that the outcome of one test does not influence another.
- Enhanced Test Integrity: Transactional testing enhances the overall integrity of the test suite. By ensuring that each test interacts with the database in a controlled and predictable manner, it reduces the likelihood of flaky tests – those that produce inconsistent results – thereby increasing confidence in the test suite.
Alexey Krol
Chief Business Development OfficerConsulted 30+ IoT startups to speed up time to market.
Get a ConsultationSection II: Database Reset Strategy
Conceptual Framework
The Database Reset Strategy in testing revolves around a fundamental concept: resetting the database to a known, consistent state before or after each test. This strategy is designed to ensure that each test runs against a database that is free from the influence of previous tests, thereby maintaining the integrity and reliability of test results.
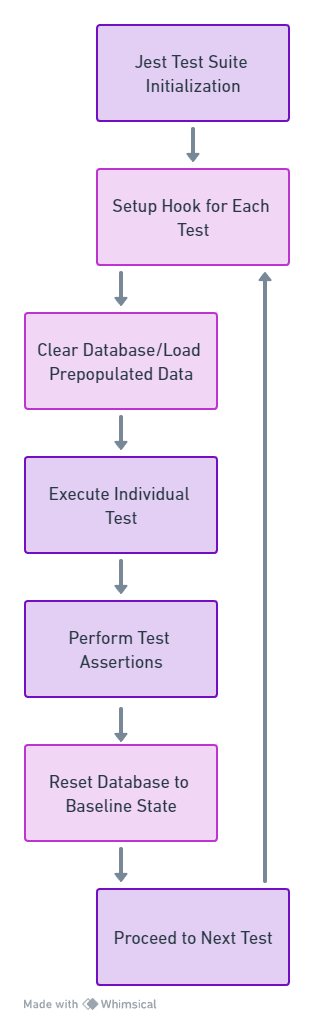
Fig 2. Database Reset Strategy Flowchart
Under this framework, the database is typically populated with a baseline set of data before the tests are executed. Once a test is completed, the database is either rolled back to its original state or completely rebuilt from scratch. This approach is particularly effective in situations where maintaining transactional integrity within each test is impractical or impossible, such as in complex integration tests or when dealing with databases that do not support transactional tests efficiently.
The Database Reset Strategy, thus, provides a clean slate for each test, ensuring that tests are not only independent of each other but also reflective of real-world scenarios as closely as possible.
Challenges
Implementing a Database Reset Strategy in testing environments presents several challenges:
- Performance Overhead: Resetting the database either partially or entirely can be time-consuming, especially for large datasets or complex schema structures. This overhead can significantly slow down the testing process.
- Data Integrity and Consistency: Ensuring that the baseline data is consistently and accurately reloaded after each test can be challenging. Any discrepancies in the reset process can lead to unreliable test results.
- Resource Intensive: Frequent database resets demand considerable computational resources, which can be a constraint in resource-limited environments or when dealing with large-scale applications.
- Complex Setup and Maintenance: Setting up a robust database reset mechanism, especially for sophisticated applications with numerous interdependencies, requires careful planning and ongoing maintenance.
Leverages
The Database Reset Strategy, despite its challenges, offers several key advantages:
- Comprehensive Environment Refresh: It provides a complete refresh of the testing environment, ensuring no residual data from previous tests can influence the outcome of subsequent tests.
- Suitability for Complex Interactions: This strategy is particularly beneficial in scenarios involving complex data interactions or when testing features that are not easily isolated within transactions.
- Flexibility in Diverse Testing Scenarios: The ability to reset the database makes this strategy versatile, applicable across various types of databases and testing scenarios, including those where transactional methods are not viable.
- Enhanced Test Reliability: By consistently reverting to a known state, the Database Reset Strategy enhances the reliability and repeatability of tests, crucial for accurate and dependable testing outcomes.
Section III: Mocking Database Connections
Conceptual Basis
Mocking Database Connections involves creating lightweight, in-memory instances of database services for each test. This approach provides a unique, isolated environment for every test, greatly reducing the overhead compared to traditional database operations.
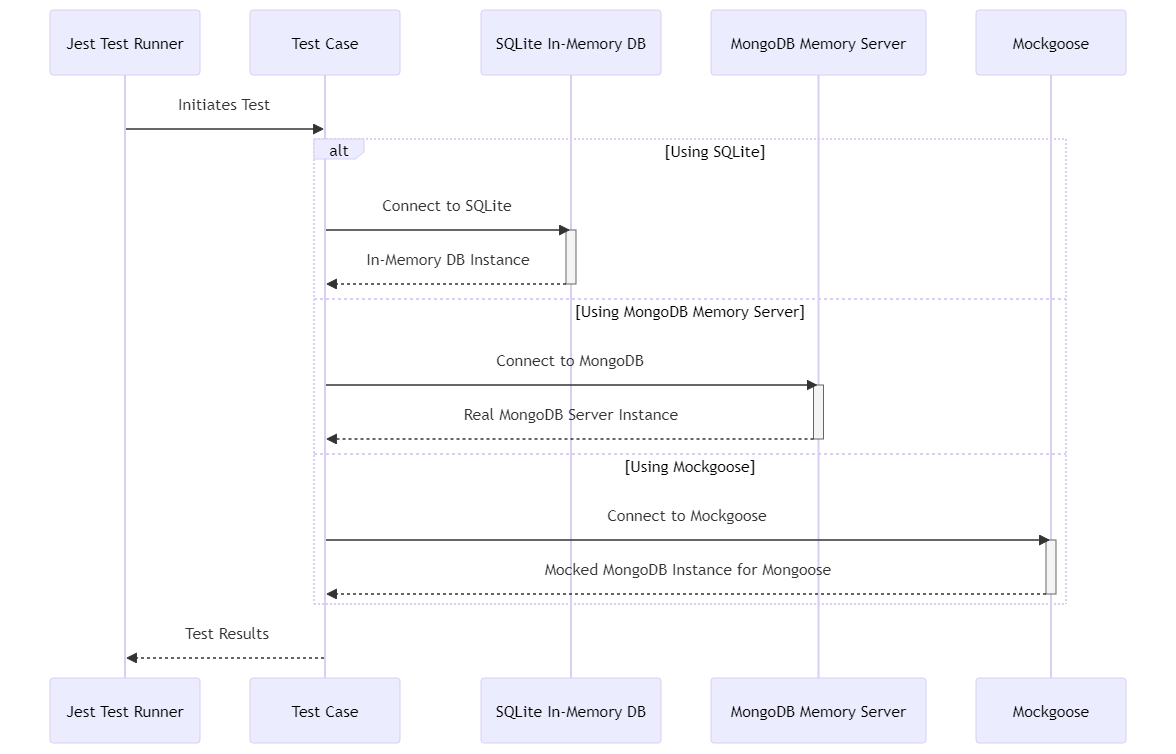
Fig 3. Mocking Database Connections
Examples of Services for Mocking Database Connections:
- SQLite in-memory database: Often used for testing because of its simplicity and the fact that it does not require a separate server process. SQLite can simulate a full-fledged database entirely in memory.
- MongoDB Memory Server: This package spins up an actual/real MongoDB server programmatically from within Node.js, ideal for testing purposes. It’s perfect for environments where installing a MongoDB server is not possible or desirable.
- Mockgoose: A package designed to extend the MongoDB Memory Server for Mongoose users, providing an in-memory database mock to test MongoDB operations.
These tools allow developers to run a full suite of tests without the need for a persistent database, ensuring fast and efficient testing while maintaining isolation between tests.
Challenges
In the nuanced world of database testing, the subtleties of behavioral differences between a main database and its mocked counterpart can be both enlightening and challenging. Take, for instance, the comparison between SQLite and MySQL. SQLite, with its lightweight architecture, is a popular choice for in-memory testing. However, it diverges from MySQL in critical ways. MySQL, known for its robustness and feature-rich environment, handles certain SQL syntax and functions differently compared to the more streamlined SQLite. This includes variances in handling complex queries, data types, and even subtle differences in how transactions are managed.
Moreover, SQLite’s concurrency model, which is simpler and more suited for low-volume, high-read scenarios, contrasts sharply with MySQL’s more sophisticated handling of concurrent transactions. These disparities can lead to misleading test results, especially in high-concurrency scenarios.
The limited feature set of mock databases is another point of contention. While they brilliantly simulate basic database functionalities, their replication of advanced features like stored procedures, triggers, or specific indexing strategies often falls short. For instance, SQLite’s approach to data typing is more lenient compared to MySQL, potentially overlooking data integrity issues that might arise in production.
These examples underline the need for a discerning approach to using mocked databases, ensuring that the tests are tailored to recognize and accommodate these fundamental differences, thereby preserving the integrity and relevance of the testing process
Also, while faster than full-fledged databases, mock databases still introduce overhead, particularly in resource-constrained environments or when simulating large datasets
Advantages
Mocking database connections, despite its challenges, offers distinct advantages:
- Rapid Test Execution: In-memory databases like SQLite enable faster test execution due to their simplified setup and in-memory operations, significantly reducing the time required for running extensive test suites.
- Isolation and Consistency: Each test runs against its isolated instance, ensuring a consistent starting state and preventing side effects from affecting other tests.
- Reduced Infrastructure Dependency: Since the mocked database is in-memory and typically lightweight, there’s less dependency on external infrastructure, making the setup easier and more suited for continuous integration pipelines.
Section IV: Mocking Connection Drivers
Ideology
The ideology behind mocking connection drivers in testing pivots on the principle of complete isolation and control. By stubbing the database driver, this method avoids establishing any real communication with the database. Instead, it intercepts database queries and provides predefined responses for each test. This approach allows for precise specification of query outcomes, enabling tests to focus on specific behaviors or scenarios without the variability introduced by actual database interactions.
Post-test, the mocks are restored to their original state, ensuring that each test begins with a clean, unaltered environment. This technique is particularly useful for unit testing, where the focus is on the behavior of individual components rather than their interaction with external systems.
Technical Drawbacks
Mocking connection drivers, while offering control and isolation, comes with significant technical drawbacks:
- Lack of Real-World Interaction Testing: By mocking the database driver, the tests don’t actually verify the interactions with the real database. This means it doesn’t validate whether the database calls will succeed in a real environment. It tests the business logic under the assumption that the infrastructure behaves as expected, potentially overlooking issues that might arise in actual database interaction.
- Increased Code for Mocking: Explicitly mocking responses for each test can lead to a substantial amount of additional code. This not only increases the maintenance burden but also the complexity of the test suite.
- Risk of Misaligned Mocks: There’s a risk that the mocked responses may not accurately reflect the behavior of the real database, leading to false positives or negatives in testing.
- Difficulty in Simulating Complex Scenarios: Complex database behaviors, such as transactions, concurrent access, or error conditions, can be challenging to mock accurately. This might lead to oversimplified tests that fail to capture the nuances of real database interactions.
- Brittleness to Schema Changes: Mocks are often tightly coupled with the current schema and queries. If the database schema or queries change, the mocks may become outdated, requiring significant effort to update and maintain.
- Limited Insight into Performance Issues: Since the actual database is not involved, performance issues related to database operations, such as slow queries or indexing problems, are not identified during testing.
Advantages
Despite its drawbacks, mocking connection drivers offers notable advantages:
- Focused Testing of Business Logic: By isolating the business logic from database interactions, it enables developers to test the application logic thoroughly without external dependencies.
- Fast Test Execution: Since it bypasses actual database calls, tests run significantly faster, enhancing the speed of the development cycle.
- Ideal for Unit Testing: Mocking is particularly suited for unit tests, where the focus is on testing individual components in isolation.
- Controlled Testing Environment: It provides complete control over the test environment, allowing precise simulation of various data scenarios and error conditions.
Section V: Managing Isolation in Parallel Testing
Jest Parallelism: How Jest handles parallel test execution and its impact on isolation strategies
Jest’s mechanism for parallel test execution is a sophisticated orchestration that significantly enhances testing efficiency. At its core, Jest intelligently distributes test files across multiple worker processes, based on the system’s available CPU cores. This distribution ensures that each test file is executed in isolation, in its own unique process environment.
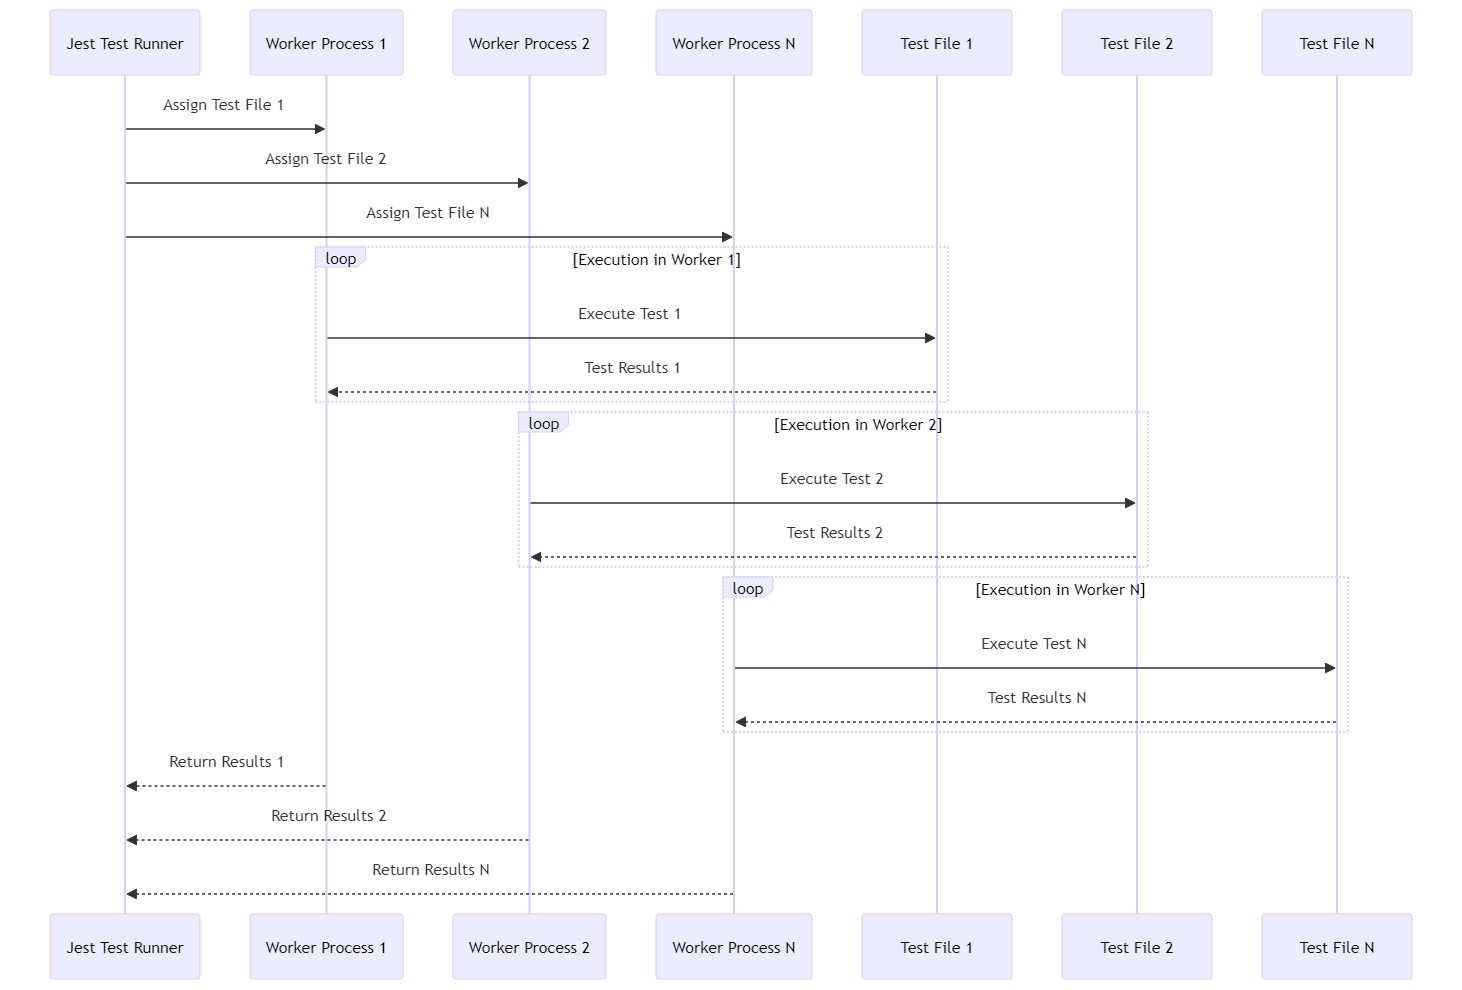
Fig 4. Jest Parallelism
By doing so, Jest maximizes resource utilization and minimizes the overall time taken for the test suite to complete. Each worker process executes its allocated tests independently, without direct interaction with others, thereby reducing the chances of process-level contention or interference.
This parallel execution model, while highly efficient, requires careful consideration in the context of shared resources like databases. Since each process operates independently, strategies that rely on shared states or resources must be designed to handle this concurrency effectively, ensuring that tests remain isolated and do not inadvertently impact one another.
Transactional Tests in Parallel
Conceptual Overview
In the intricate dance of parallel testing, where Jest elegantly orchestrates multiple tests to run concurrently, transactional tests introduce a layer of complexity that cannot be overlooked. Each test, ensconced in its own transaction, demands exclusive access to certain database resources, leading to a scenario ripe for contention. As these parallel processes vie for the database’s attention, the risk of deadlocks and performance bottlenecks escalates, challenging the very integrity of the testing process.
The complexity of managing these transactions is heightened in this parallel milieu. Ensuring that each transaction remains an isolated affair, uninfluenced and uninfluencing of its peers, requires a deft hand in coordination. This orchestration is further complicated when considering that transactions, by their nature, are meant to be atomic and isolated, yet here they are, running alongside others in a bustling environment.
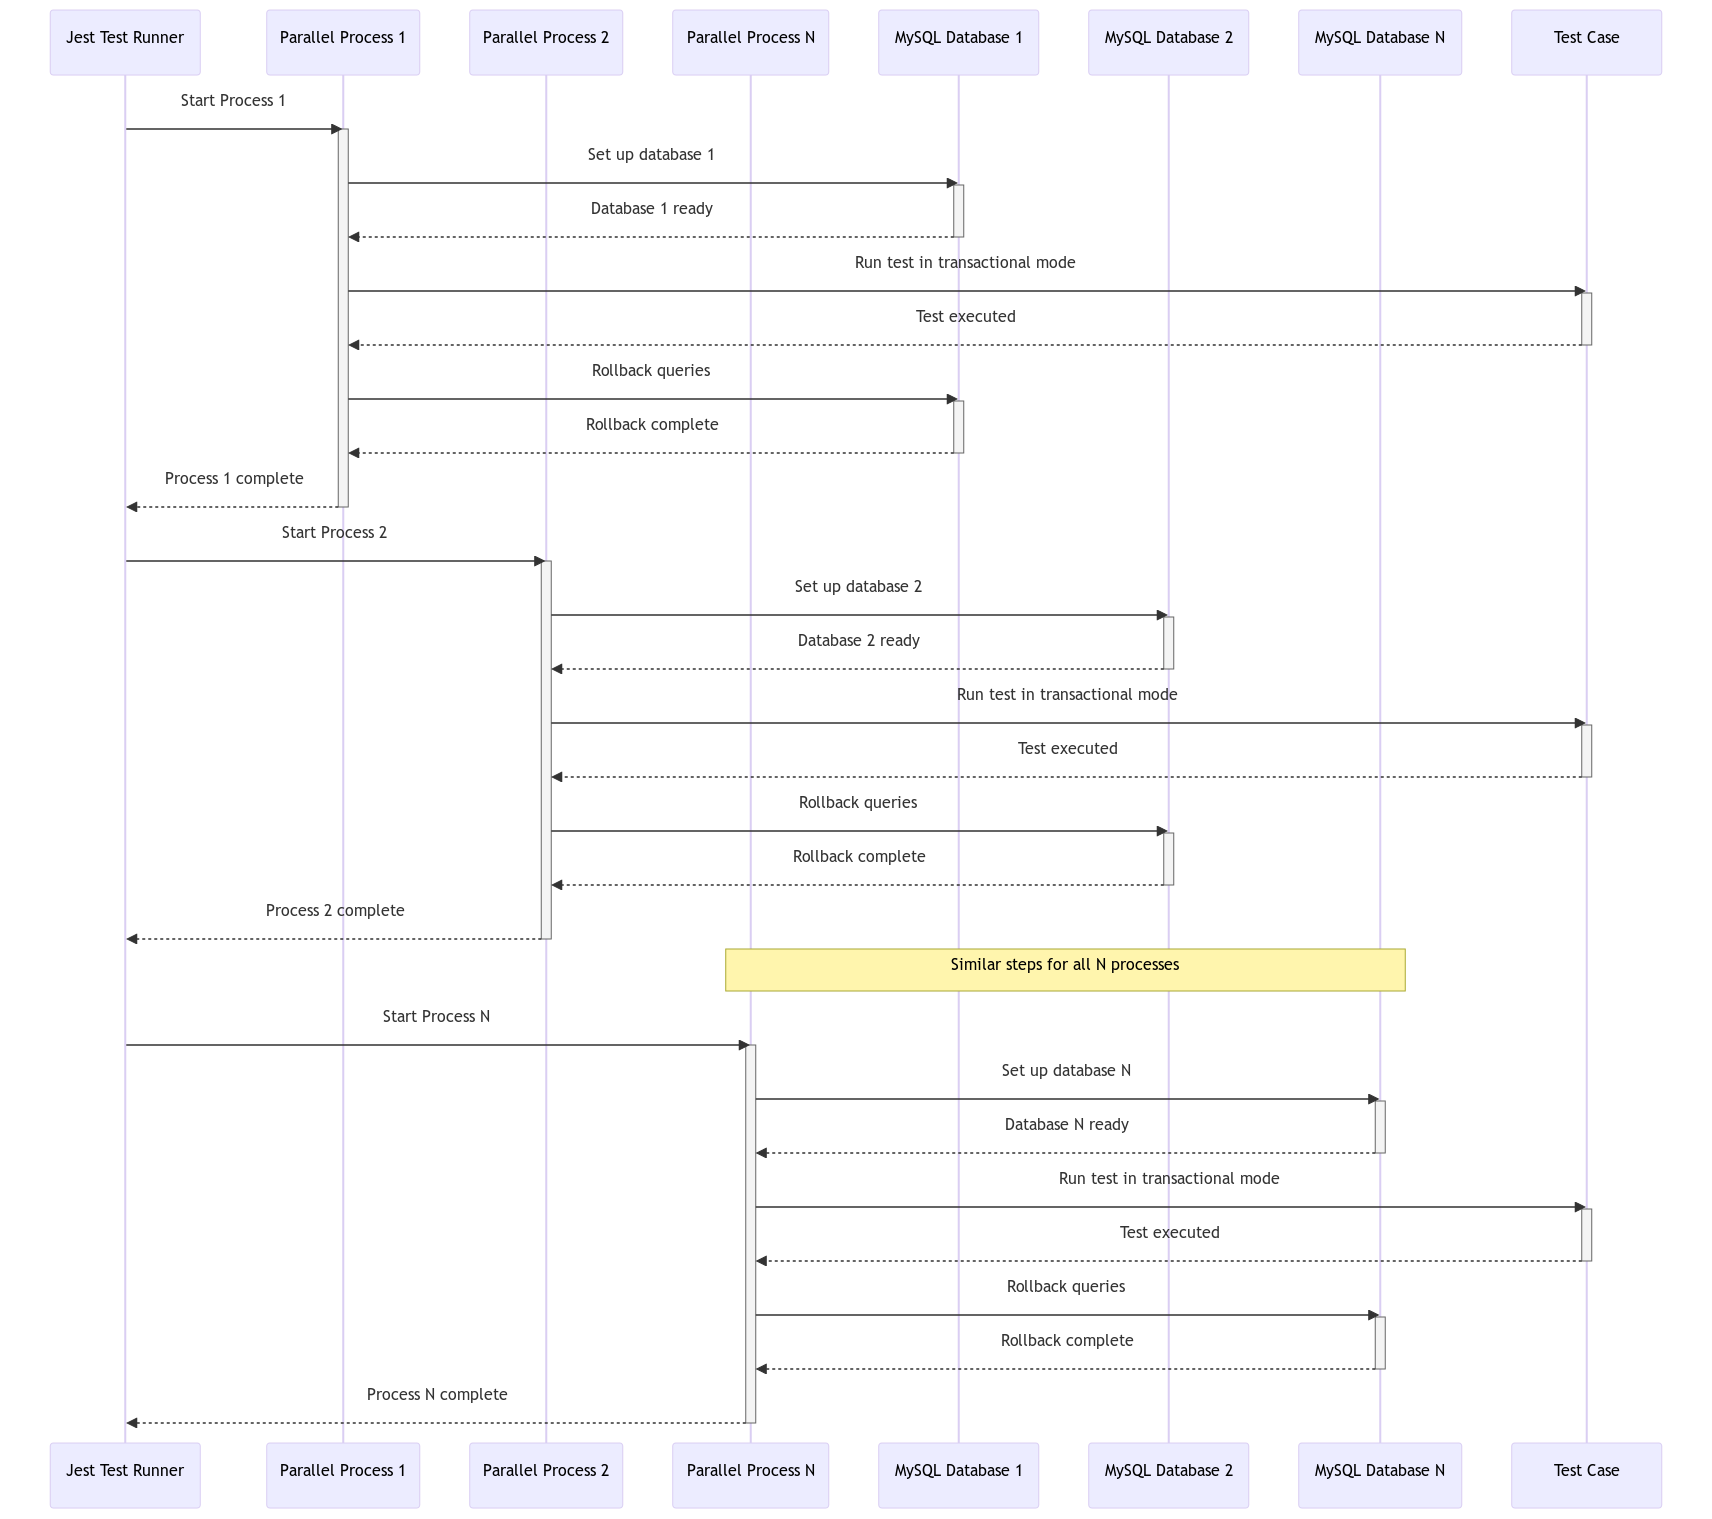
Fig 5. Transactional Tests in Parallel
Moreover, the specter of data inconsistencies looms large. In an ideal world, each test would operate in blissful ignorance of the others, but the reality is often messier. A transaction in one test might inadvertently leave a footprint that mars the pristine testing ground of another, leading to results that are as perplexing as they are misleading.
This ballet of transactional tests in parallel environments, while a testament to Jest’s capabilities, is a reminder of the careful planning and robust architectural design required to ensure that each step, each move, is both precise and harmonious.
Testing Environments Parallelization Solution
Addressing the challenges of transactional tests in parallel environments, a viable and effective solution emerges: setting up a separate database instance for each thread of parallel tests orchestrated by Jest. This approach effectively compartmentalizes the transactional activities of each test suite, thereby mitigating the risks of resource contention and data inconsistencies.
By isolating databases at the thread level, each test operates within its own self-contained universe, free from the perils of cross-test interference. This not only preserves the atomicity and isolation of transactions but also maintains the overall integrity and reliability of the testing process. It’s a strategic move that harmonizes the demands of parallel execution with the stringent requirements of transactional testing, ensuring a smoother, more accurate testing journey.
Database Resets with Parallel Tests
Evaluating Pitfalls
When tests are executed concurrently, as orchestrated by Jest, each one altering the database in its way, the act of resetting the database becomes a high-wire act. The challenge is not just in resetting the state but in doing so in a manner that is harmoniously synchronized with other tests running in tandem.
Imagine a scenario where one test is midway, interacting with the database, and another test triggers a reset. This can lead to unpredictable outcomes, where tests may fail not due to flaws in the code but because of timing issues related to the reset process. It’s akin to changing the stage while the actors are still performing, leading to a disjointed and confusing play.
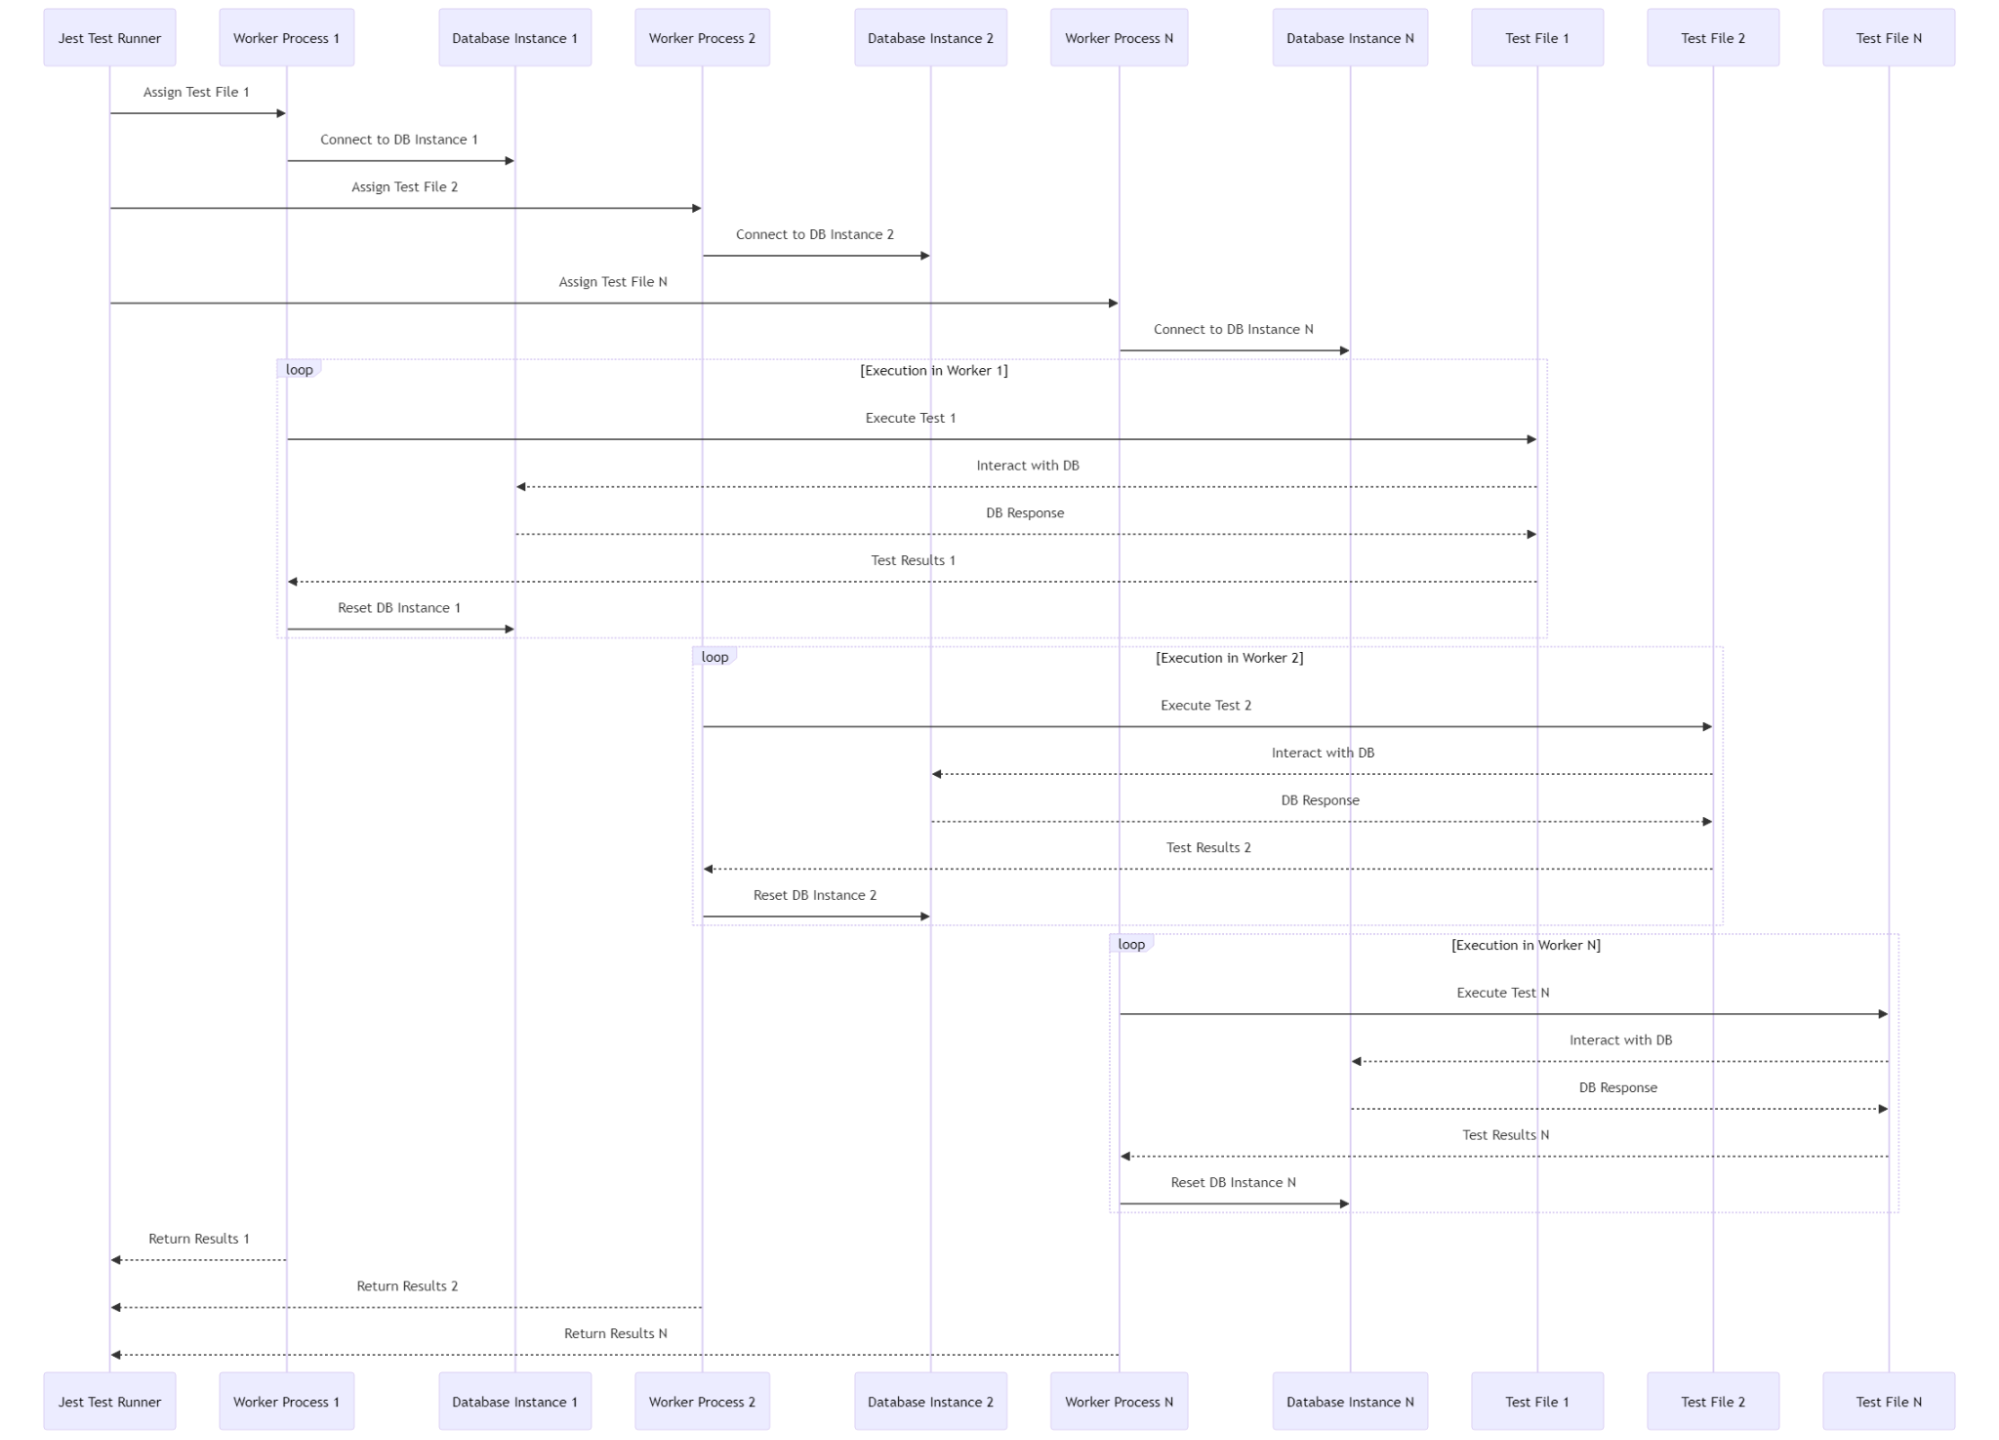
Fig 6. Database Resets with Parallel Tests
Moreover, the time taken to reset the database in each parallel stream adds up, potentially offsetting the time saved by parallel execution. It’s a delicate balance – ensuring each test has a clean slate without bogging down the overall test suite with prolonged reset operations.
This complex interplay of database resets in parallel testing environments calls for a nuanced approach, one that meticulously aligns the reset process with the parallel nature of the tests, ensuring that each test’s interaction with the database is both isolated and timely.
Parallelized Database Resets Solution
Navigating the complexities of database resets in parallel testing, the solution lies in echoing the approach used for transactional tests: creating a separate database instance for each parallel thread managed by Jest. This strategy ensures that each testing stream operates in its isolated environment, unimpeded by the actions of others.
With a dedicated database for each thread, the reset process becomes a streamlined affair, untangled from the intricacies of concurrent tests. This not only safeguards the integrity of each test but also maximizes the efficiency gained from parallel execution, striking a harmonious balance in the dynamic world of automated testing.
Applying Connection Mocking in Parallel Test Execution
While tools like SQLite’s in-memory database, MongoDB Memory Server, and Mockgoose offer the allure of efficiency and isolation, their integration into a parallel testing framework isn’t without hurdles.
To address this, deploying an in-memory database for each thread offers a practical solution. Tools like SQLite’s in-memory database or MongoDB Memory Server could be employed, creating distinct database instances for each individual test thread. This ensures isolated, interference-free environments for each test. The approach combines the benefits of speed, due to in-memory operations, with the ease of resetting databases between tests, enhancing both efficiency and accuracy.
Drivers Mocking in Parallel Tests
Mocking database drivers in parallel testing environments, particularly with Jest, introduces a distinct approach compared to traditional mocking strategies. In this setup, each test or suite of tests employs stubs or mocks at the driver level, simulating database interactions.
The advantage here is profound: since each test encapsulates its own set of mocks, there’s no shared resource or state between the tests, even when they run in parallel. This isolation ensures that the mocks function independently across each parallel test stream, providing a reliable and consistent testing environment. The absence of shared resources in driver mocking minimizes the complexities typically associated with parallel execution, making it an effective strategy for validating business logic under controlled conditions.
Conclusions
In this intricate journey of testing strategies, our exploration has led us to distinct yet interconnected paths. Transactional tests, with their stringent isolation, are invaluable for scenarios demanding high data integrity, yet they grapple with the complexities of parallel execution. Database resets, offering a comprehensive environment refresh, are suited for tests where transactional boundaries are blurred, though they come at the cost of performance overheads.
Mocking, both at the connection and driver levels, shines in its ability to offer rapid execution and focused testing of business logic, free from the constraints of actual database interactions. It is particularly effective in unit testing and scenarios where database behavior is less critical.
In practical terms, the choice of strategy hinges on the specific needs of the project. For applications where database interactions are complex and integral, transactional tests and database resets provide a more realistic testing environment. Conversely, for applications where speed and isolation are paramount, and the intricacies of database interactions are less crucial, mocking emerges as the preferable option.
Ultimately, the art of choosing the right strategy lies in balancing these factors, tailoring the approach to align with the project’s goals, resource availability, and the desired fidelity of the testing environment to real-world conditions.
For businesses navigating complex IoT ecosystems, leveraging custom IoT solutions can ensure the right testing strategies, security measures, and scalable architectures for long-term success.
Useful Links
- MySQL documentation on SQL Syntax for Transactions. [Online] Link: https://dev.mysql.com/doc/refman/8.0/en/commit.html
- MySQL Transactional Engines: MySQL Documentation on Storage Engines – Offers insights into different storage engines in MySQL, particularly comparing MyISAM (non-transactional) and InnoDB (transactional). [Online] Link: https://dev.mysql.com/doc/refman/8.0/en/storage-engines.html
- PostgreSQL’s features for transaction management are detailed in its official documentation on Transactional Control. [Online] Link: https://www.postgresql.org/docs/current/sql-begin.html
- MongoDB’s transaction support, including use cases and limitations, is covered in the Transactions section of its official documentation. Provides a general understanding of ACID properties, foundational for transactional testing in relational databases like MySQL and PostgreSQL. [Online] Link: https://www.mongodb.com/docs/manual/core/transactions/https://docs.mongodb.com/manual/core/transactions/
- Performance Aspects of MongoDB Transactions: MongoDB Transactions and Performance – Discusses the performance considerations and best practices for using transactions in MongoDB, highlighting potential impacts on testing scenarios. [Online] Link: https://www.mongodb.com/blog/post/performance-best-practices-transactions-and-read-write-concerns
- ACID Properties in Relational Databases: ACID Properties Overview – Provides a general understanding of ACID properties, foundational for transactional testing in relational databases like MySQL and PostgreSQL. [Online] Link: https://docs.digitalocean.com/glossary/acid/
- SQLite In-Memory Databases. [Online] Link: https://www.sqlite.org/inmemorydb.html
- MongoDB Memory Server. [Online] Link: https://www.npmjs.com/package/mongodb-memory-server
- Mockgoose. [Online] Link: https://www.npmjs.com/package/mockgoose
- If you are interested in learning more about how Jest works, understand its architecture, and how Jest is split up into individual reusable packages, check out their video about Jest Architecture. [Online] Link: https://jestjs.io/docs/architecture


Written by:
Maksym Kotov
Node.js developer at Webbylab
Experienced Node.js developer passionate about crafting scalable backend solutions. Keen on JavaScript/TypeScript ecosystems, DevOps practices, and continuous learning.